|
|
These API functions can be used to determine the current or default value of an attribute: |
|
|

|
GetGraphAttr(); Get attribute information for a specific graph object |
|
|
|
GetGraphAttrSI(); Get attribute information for a specific item in a selection list |
|
|
|
GetGraphAttrSL(); Get attribute information for the first item in a selection list |
|
|
All three of these functions store the current value of an attribute at a user-specified memory location. |
|
|
The GetGraphAttr() function lets you request attribute information for a specific object. The prototype for this function is shown below: |
|
|
INT16 PUBLIC GetGraphAttr(
GraphPtr pGraph, /* graph pointer */
INT16 nLayerID, /* layer ID */
INT16 nObjectID, /* object ID */
INT16 nSeriesID, /* series ID */
INT16 nGroupID, /* group ID */
INT16 attrCode, /* attribute */
void FAR * pData /* ptr to store attribute info */
); |
|
|
With GetGraphAttr(), you identify a specific object (nObjectID) from which you wish to obtain attribute information. However, note that in many cases an object ID is not required to obtain attribute information. The attribute code itself is object type specific and is only applicable to one type of object. For example, the A_LOCATE_TITLE attribute defines the location of the graph's title object (O5D_LBLTITLE). To get the location of the title, it is not necessary to specify the object ID (O5D_LBLTITLE) because the attribute code itself identifies the object. Each attribute description in the PGSDK Attributes Guide identifies whether or not an ObjectID, SeriesID, and/or GroupID is required to get or set the attribute. Where there are multiple instances of the same object (e.g., risers), the series (nSeriesID) and group ID (nGroupID) parameters can be used to identify a particular instance of an object. With the attrCode parameter, you identify the attribute information to be retrieved. The pData parameter is a pointer to a location where the attribute information can be stored. This could be a pointer to an integer, double, structure, or other data type depending on the attribute. As an example, the following statement requests the color (A_FONTCOLOR_RGB) attribute of the graph's title object (O5D_LBLTITLE): |
|
|
nRet = GetGraphAttr(pGraph, GRAPH_LAYER,
O5D_LBLTITLE,NULL_SERIESID, NULL_GROUPID,
A_FONTCOLOR_RGB,(void FAR *)&titlecolor); |
|
|
Since there are not multiple instances of the label title, the null series and group IDs can be used. |
|
|
The following example requests the marker shape information (A2D_MARKERSHAPE) from Series 1, Group 0 of the riser (O2D_RISER) object. |
|
|
nRet = GetGraphAttr ( gpGraph, GRAPH_LAYER,
O2D_RISER, 1, 0, A2D_MARKERSHAPE, &rShape ); |
|
|
In both examples, the value of nRet will indicate whether or not the attribute information was successfully obtained. Zero indicates the attribute information was successfully retrieved and stored at pData. A non-Zero value indicates failure (i.e., invalid object/attribute combination, invalid series ID, etc.) |
|
|
Rather than identifying a specific Object ID, the GetGraphAttrSI() function lets you choose the object as an item in a selection list. The prototype for this function is shown below: |
|
|
INT16 GetGraphAttrSI (
GraphPtr pGraph, /* Graph Pointer */
SelItemPtr pItem, /* Selection List Item */
INT16 attrCode, /* Attribute Code */
void FAR * pData ); /* Place to store value */
); |
|
|
With this function, you identify an object in the graph by specifying an item (pItem) in a selection list. Again, the attribute code (attrCode) identifies the information that you want to obtain about the item. The pData parameter is a pointer to a location where the attribute value can be stored. This could be a pointer to an integer, double, structure, or other data type depending on the attribute. As an example, the following statement is requesting the color of the font (A_FONTCOLOR_RGB) for the item in the selection list at gpSelItem: |
|
|
nRet = GetGraphAttrSI (
gpGraph, /* graph pointer */
gpSelItem, /* pointer to selection item */
A_FONTCOLOR_RGB, /* attribute to modify */
&rgbOld /* old attribute value */
); |
|
|
The following example is requesting the font name (A_FONTNAME) of the object at gpSelItem: |
|
|
nRet = GetGraphAttrSI (
gpGraph, gpSelItem, A_FONTNAME, &szFontName ); |
|
|
In both examples, the value of nRet will indicate whether or not the attribute information was successfully obtained. Zero indicates the attribute information was successfully retrieved and stored at pData. A non-Zero value indicates failure (i.e., invalid object/attribute combination, item not in selection list, etc.) |
|
|
The GetGraphAttrSL() function requests attribute information for the first item in a selection list: |
|
|
INT16 GetGraphAttrSL (
GraphPtr pGraph, /* Graph Pointer */
SelListPtr pSelList, /* Selection List Ptr*/
INT16 attrCode, /* Attribute Code */
void FAR * pData /* Place to store value */
); |
|
|
With this function, you identify a pointer to a selection list (pSelList). The attribute code (attrCode) identifies the attribute information that you wish to obtain. The pData parameter is a pointer to a location where the attribute value will be stored. This could be a pointer to an integer, double, structure, or other data type depending on the attribute. This function will set pData to the attribute value of the first item in the list where a matching attribute code is defined. As an example, the following statement is requesting the color of the font (A_FONTCOLOR_RGB) for the first item in the selection list at gpList: |
|
|
nRet = GetGraphAttrSL(
gpGraph, /* graph pointer */
gpList, /* pointer to selection list */
A_FONTCOLOR_RGB, /* attribute to modify */
&rgbOld /* old attribute value */
); |
|
|
The following example is requesting the visibility status (A_SHOW_TITLE) of the title object (O5D_LBLTITLE): |
|
|
nRet = GetGraphAttrSL(
pGraph,pSelList, A_SHOW_TITLE,&nTemp
); |
|
|
In both examples, the value of nRet will indicate whether or not the attribute information was successfully obtained. Zero indicates the attribute information was successfully retrieved. A non-Zero value indicates failure (i.e., selection list not valid, no matching information in the list, etc.) |
|
|
There are three API functions that can be used to set the value of an attribute: |
|
|
|
SetGraphAttr(); Set attribute information for a specific object |
|
|
|
SetGraphAttrSI(); Set attribute information for a specific item in a selection list |
|
|
|
SetGraphAttrSL(); Set attribute information for all items in a selection list where the attribute is applicable. |
|
|
In all three cases, you identify an attribute by its attribute code and specify attribute information that you want to apply to an object in the graph. The SetGraphAttrSL function will only choose items in the selection list that are appropriate to the attribute being used. For example, the A_AREACOLOR_RGB attribute can only be applied to area objects. If there are no area objects in the selection list, the SetGraphAttrSL() function is ignored and a failure status is returned. Also note that other factors/attributes may eliminate some items from being chosen by SetGraphAttrSL(). If an item's A_AREACOLOR_NONE attribute is applied (for example), the color cannot be changed by A_AREACOLOR_RGB. |
|
|
The SetGraphAttr() function lets you specify attribute information for a specific object. The prototype for this function is shown below: |
|
|
INT16 PUBLIC SetGraphAttr(
GraphPtr pGraph, /* graph pointer */
INT16 nLayerID, /* layer identifier */
INT16 nObjectID, /* object ID */
INT16 nSeriesID, /* series ID */
INT16 nGroupID, /* group ID */
INT16 attrCode, /* attribute code */
void FAR * pData /* ptr to attribute data */
); |
|
|
With SetGraphAttr(), you identify a specific object (nObjectID) for which you want to specify attribute information. Note that in many cases an object ID is not required to set the attribute. The attribute code (attrCode) itself is object type specific and is only applicable to one type of object. For example, the A2D_SHOW_ERRORBAR attribute enables/disables the error bar object (O2D_ERRORBAR). To enable/disable the error bar, it is not necessary to specify the object ID (O2D_ERRORBAR) because the attribute code itself identifies the object. The attribute descriptions in the PGSDK Attributes Guide identify whether or not an ObjectID, SeriesID, and/or GroupID is required to get or set the attribute. Where there are multiple instances of the same object (e.g., risers), the series (nSeriesID) and group ID (nGroupID) parameters can be used to identify a particular instance of an object. With the attrCode parameter , you identify the attribute information to be set. The pData parameter is a pointer to a location where user-defined attribute information is stored. This could be a pointer to an integer, double, structure, or other data type depending on the attribute. The data type specific to each attribute is also included in the PGSDK Attributes Guide. When successfully executed, this function will apply the information at pData to the object. |
|
|
As an example, the following statement sets the color attribute (A_FONTCOLOR_RGB) of the graph's title object (O5D_LBLTITLE) to the color values stored at titlecolor. |
|
|
//set the color of the title to red
nRet = SetGraphAttr(pGraph, GRAPH_LAYER,
O5D_LBLTITLE, NULL_SERIESID, NULL_GROUPID,
A_FONTCOLOR_RGB, (void FAR *)&titlecolor
); |
|
|
The following example sets the visibility status of the graph's title. Note that in this case the object ID is not required: |
|
|
// make the title appear in the graph
nRet = SetGraphAttr(pGraph, GRAPH_LAYER,
NULL_OBJECTID, NULL_SERIESID, NULL_GROUPID,
A_SHOW_TITLE, (void FAR *)&bTRUE
); |
|
|
In both examples, the value of nRet will indicate whether or not the attribute information was successfully set. Zero indicates the attribute information was successfully set. A non-Zero value indicates failure (i.e., invalid object/attribute combination, etc.) |
|
|
Rather than identifying a specific Object ID, the SetGraphAttrSI() function lets you choose the object as an item in a selection list. The prototype for this function is shown below: |
|
|
INT16 SetGraphAttrSI (
GraphPtr pGraph, /* Graph Pointer */
SelItemPtr pItem, /* Selection List Item */
INT16 attrCode, /* Attribute Code */
void FAR * pData /* Pointer to data value */
); |
|
|
With this function, you identify an object in the graph by specifying an item (pItem) in a selection list. The attribute code (attrCode) identifies the kind of information that you want to apply to the item in the list. The pData parameter is a pointer to a location where you have stored the attribute information. This could be a pointer to an integer, double, structure, or other data type depending on the attribute. When successfully executed, this function will apply the information at pData to the item/object. As an example, the following statement sets the alignment (A_FONTALIGN) of a text object at gpSelItem to right justified (&Right): |
|
|
nRet=SetGraphAttrSI(
gpGraph,gpSelItem, A_FONTALIGN,&Right
); |
|
|
The following example sets the color of an area object at gpSelItem to the color values stored at aRGB[5]: |
|
|
nRet = SetGraphAttrSI (
gpGraph, gpSelItem, A_AREACOLOR_RGB, &aRGB[5]
); |
|
|
In both examples, the value of nRet will indicate whether or not the attribute information was successfully set. Zero indicates the attribute information was successfully applied to the item/object. A non-Zero value indicates failure (i.e., invalid object/attribute combination, item not in selection list, etc.) |
|
|
The SetGraphAttrSL() function is used to set an attribute for all items in a selection list: |
|
|
INT16 SetGraphAttrSL (
GraphPtr pGraph, /* Graph Pointer */
SelListPtr pSelList,/* Selection List Ptr */
INT16 attrCode, /* Attribute Code */
void FAR * pData /* Attribute Value */
); |
|
|
With this function, you identify the attributes to be set by providing a pointer to a selection list (pSelList). The attribute code (attrCode) identifies the attribute information that you wish to modify. The pData parameter is a pointer to a location where the attribute information is stored. This could be a pointer to an integer, double, structure, or other data type depending on the attribute. |
|
|
This function will search the selection list and apply the attribute information at pData to all items in the list that are selected and appropriate for the given attribute (e.g., an A_FONTCOLOR_RGB attribute would not be applied to a line object). As an example, the following statement sets the font color (A_FONTCOLOR_RGB) for all selected text items in the selection list at gpList to the color values stored at aRGB[i]: |
|
|
nRet = SetGraphAttrSL (
gpGraph, gpList, A_FONTCOLOR_RGB, &aRGB[i]
); |
|
|
The following example changes the data format for all x,y data labels to the format code stored at nFormat2. |
|
|
nRet = SetGraphAttrSL (
gpGraph, gpList, A2D_DATAFORMAT, &nFormat2
); |
|
|
In both examples, the value of nRet will indicate whether or not the attribute information was successfully applied. Zero indicates the attribute information was successfully set. A non-Zero value indicates failure (i.e., selection list not valid, etc.). |
|
|
As a short-cut, you may specify NULL as the gpList in SetGraphAttrSL() to assign an attribute to non-series specific items. |
|
|
The text on the chart uses native fonts and any custom fonts that are defined in your application's environment. There are basically four attributes that affect the font and style of text objects in a graph. They are as follows: |
|
|
|
A_FONTNAME: Defines the name of the font to use for text. |
|
|
|
A_FONTORIENT: Defines the orientation of a font. |
|
|
|
A_FONTSIZE_VC: Defines the font size in virtual coordinates. |
|
|
|
A_FONTSTYLE: Defines a font style (underline, bold, etc.). |
|
|
A_FONTNAME: To change the font of one or more text objects, identify the font name, pitch and character set in a FontNameInfo data structure as shown in the following example: |
|
|
FontNameInfo HelvFont = {
"Helv",
DEFAULT_PITCH,
ANSI_CHARSET,0
} |
|
|
Then use one of the Set Graph Attribute functions to apply the attribute to one or more text objects as shown in the following example: |
|
|
SetGraphAttrSI(gpGraph,gpSelItem,A_FONTNAME,&HelvFont); |
|
|
This example changes the font of an object in a selection list at gpSelItem to use the Helvetica font defined at HelvFont. Note that the font name, pitch, and character set values must match constants found in the application environment. They are not defined in the graphics library. |
|
|
A_FONTORIENT: This attribute is used to select the orientation of a font. The library currently supports normal horizontal text and vertical (hotel mode) text. The following example sets the font orientation for the Y1 axis title (O2D_Y1_TITLE) to the vertical/hotel mode: |
|
|
INT16 HotelText = FONTORIENT_HOTEL;
SetGraphAttr ( gpGraph, GRAPH_LAYER,
O2D_Y1_TITLE, NULL_SERIESID, NULL_GROUPID,
A_FONTORIENT, &HotelText
); |
|
|
Setting the A_FONTORIENT attribute to FONTORIENT_HOTEL causes the specified text object to appear in a vertical/hotel format. |
|
|
Example: |
|
|
Y
1
T
I
T
L
E |
|
|
A_FONTSIZE_VC: This attribute can be used to select a font size in virtual coordinates. The following example processes a user specified font size (in points) that has been stored at TempBuf to set the font size in virtual coordinates: |
|
|
char TempBuf [MaxStringSz];
INT16 vFontSize, dFontSize;
dFontSize = atoi ( TempBuf );
//Convert from device to virtual coordinates
vFontSize = dvScaleHeight(gpDrawEnv,dFontSize);
SetGraphAttrSI(gpGraph,gpSelItem,
A_FONTSIZE_VC,&vFontSize ); |
|
|
A_FONTSTYLE: This attribute can be used to select a font style. You can select normal, bold, italics, underlined, or any combination of these font styles. (underline, bold, etc.). The following example processes a user-selected font style in msg and selects a font style based on user input: |
|
|
INT16 nStyle;
static int aFontStyle [4] =
{
0, /* NORMAL */
1, /* BOLD */
2, /* ITALICS */
4 /* UNDERLINE */
}; |
|
|
switch ( msg )
{ |
|
|
case IDM_NORMAL: /* Normal Text Selected */
SetGraphAttrSI(gpGraph,gpSelItem,
A_FONTSTYLE, &aFontStyle [0]);
break; |
|
|
case IDM_BOLD: /* Bold Text Selected */
SetGraphAttrSI(gpGraph,gpSelItem,
A_FONTSTYLE, &aFontStyle [1]);
break; |
|
|
case IDM_ITALICS: /* Italics Selected */
SetGraphAttrSI(gpGraph,gpSelItem,
A_FONTSTYLE, &aFontStyle [2]);
break; |
|
|
case IDM_UNDERLINE: /* Underlined Text Selected */
SetGraphAttrSI(gpGraph,gpSelItem,
A_FONTSTYLE, &aFontStyle [3]);
break; |
|
|
case IDM_BI: /* Bold/Italics Selected */
nStyle = aFontStyle[1] + aFontStyle[2];
SetGraphAttrSI(gpGraph,gpSelItem,
A_FONTSTYLE, &nStyle);
break; |
|
|
case IDM_BU: /* Bold/Underlined Selected */
nStyle = aFontStyle[1] + aFontStyle[3];
SetGraphAttrSI(gpGraph,gpSelItem,
A_FONTSTYLE, &nStyle);
break; |
|
|
} |
|
|
Several attributes allow you to define the color of area, text, and line objects in the graph: |
|
|
|
A_AREABACKCOLOR: Defines the background color of patterned areas. |
|
|
|
A_AREACOLOR_NONE: Defines a transparent area. |
|
|
|
A_AREACOLOR_RGB: Defines the color of an area. |
|
|
|
A_FONTCOLOR_NONE: Defines a transparent text object. |
|
|
|
A_FONTCOLOR_RGB: Defines the color for text. |
|
|
|
A_LINECOLOR_NONE: Defines transparent line. |
|
|
|
A_LINECOLOR_RGB: Defines the color of a line. |
|
|
|
A2D_HL_COLOR: Highlight a group in a series. |
|
|
|
ACM_COLORDIVISIONS: Defines the number of colors to use when coloring by height. |
|
|
|
ACM_COLORMODEL: Defines a color scheme. |
|
|
|
ACM_SERIES_COLOR: Defines a color for a specific series of risers. |
|
|
|
ACM_WASH: Applies a smooth interpolation of color from ACM_WASHBEGIN to ACM_WASHEND. |
|
|
|
ACM_WASHBEGIN: Defines the starting color of a wash. |
|
|
|
ACM_WASHEND: Defines the ending color of a wash. |
|
|
Note in this list that the ...COLOR_RGB and ...COLOR_NONE attributes are mutually exclusive. When the ...COLOR_NONE attribute is enabled, the object is transparent and can receive no color. The ...COLOR_RGB attributes allow you to specify the color of an object in red/green/blue values. The following example code illustrates how area, line and font colors can be specified: |
|
|
RGB16 aRGB[5] =
{
{ 0, 0, 0 } /* Black */
{ FULL, FULL, FULL }/* White */
{ FULL, 0, 0 } /* Red */
{ 0, FULL, 0 } /* Green */
{ 0, 0, FULL } /* Blue */
}
SetGraphAttrSL(gpGraph,gpList,A_AREACOLOR_RGB,&aRGB[3]);
SetGraphAttrSL(gpGraph,gpList,A_FONTCOLOR_RGB,&aRGB[2]);
SetGraphAttrSL(gpGraph,gpList,A_LINECOLOR_RGB,&aRGB[0]); |
|
|
When selecting colors in the 4-bit color mode, Windows selects the nearest color match and then uses an 8 x 8 bit dither brush to create the color. Therefore, minor changes in the RGB value are noticeable on the screen. |
|
|
With 8-Bit color mode (only 256 colors), there aren't enough shades of a given color to provide color variations when the RGB values change. The default system palette contains 20 entries. If a color is not in the table, Windows finds the closest match (unlike 16 colors, which uses dithered brushes). By default, PGSDK does a PALETTERGB() look-up for Win32. You must create and select an appropriate palette into your DC. |
|
|
With 16-bit and 24-bit color systems there are enough colors to choose from so changes in the RGB values are noticeable on the screen. If additional shades of colors are required, custom color palettes must be created. |
|
|
Also refer to the following Microsoft manuals for more information about creating custom color palettes: |
|
|
|
Programmer's Reference Volume 1 Overview, Chapter 2 Graphics Device Interface |
|
|
|
Programmer's Reference Volume 2 Functions (CreatePalette(), SelectPalette() & RealizePalette() ) |
|
|
|
Reference Volume 3 Messages, Structures, Macros (LOGPALETTE & PALETTEENTRY) |
|
|
The color modeling attributes (ACM_) are used in 3D graphs to select a color-modeling scheme that will be used for all riser-type objects in a graph. You can select coloring by riser height, face, series, group, graph view, etc. Additionally, the color modeling attributes can be used to apply a wash across the selected modeling scheme. |
|
|
The following chart objects can be moved dynamically by the user: |
|
|
|
Title, Subtitle, and Footnote |
|
|
|
Row Title, Column Title and Axis Titles |
|
|
|
Graph Frame (the region of the chart that contains the graphed data) |
|
|
|
Legend |
|
|
When one of these objects is selected and highlighted, eight move/resize handles appear on the object's bounding box. These handles allow the user to move an object by clicking and dragging. The following example code illustrates the use of moving/resizing handles to move objects in the graph. |
|
|
/* MOVE AN OBJECT CODE SAMPLE* Variables not relevant to moving an object are not
* included in declarations. For example, detnodes,
* selection list pointers, selection item pointers etc.
*/ |
|
|
POINT ptMousePrev;/* mouse point before dragging */ |
|
|
POINT ptMouseCurr;/* current mouse point position */ |
|
|
POINT ptOffset;/* displacement from previous to current */ |
|
|
BOOLEAN bDrag=TRUE;/* TRUE=dragging a moveable object */ |
|
|
BOOLEAN bCapture=FALSE;/* TRUE=mouse capture is enabled */ |
|
|
RECT rObject; /* rectangle around the object */ |
|
|
HDC hdc; /* device context handle */ |
|
|
case WM_LBUTTONDOWN:
{ /* get mouse position & convert to
chart virtual coord */
ptMouseCurr = MAKEPOINT (lParam);
ptMousePrev = ptMouseCurr;
dvPoint(gpDrawEnv,&ptMouseCurr);
/* determine if there is a det node at this point */ |
|
|
if (FindDetNode (gpGraph,&ptMouseCurr, gpDetNode))
{
/* clear sel list and add new item to list */
Select_ClearList (gpList);
gpSelItem=Select_AddItem(gpGraph,gpList,gpDetNode);
Select_CalcHandlesItem(gpDrawEnv,gpSelItem);
/* determine if the object is moveable */ |
|
|
switch(gpSelItem->nObjectID)
{
case O5D_FRAME:
case O5D_LBLTITLE:
case O5D_LBLSUBTITLE:
case O5D_LBLFOOTNOTE:
case OSG_LEGEND_AREA:
case O2D_X1_TITLE:
case O2D_Y1_TITLE:
case O2D_Y2_TITLE:
/* get bounding rect for object */
rObject = gpSelItem->rcBounds;
/* convert rectangle to device coordinates */
vdRect(gpDrawEnv,&rObject); |
|
|
/* draw rectangle around object */
hdc = GetDC (hWnd);
SelectObject(hdc,GetStockObject (NULL_BRUSH));
SetROP2 (hdc, R2_NOT);
Rectangle (hdc, rObject.left,rObject.top,
rObject.right, rObject.bottom); |
|
|
ReleaseDC (hWnd,hdc); |
|
|
SetCapture (hWnd);/* lock all mouse input */
bCapture = TRUE;
bDrag=TRUE;/* set flag for object dragging */
break;
default:
break;
}
}
}
break; |
|
|
case WM_MOUSEMOVE:
{
/* make sure we are dragging a moveable object */
if (bDrag) |
|
|
{
/* get the current mouse position */
ptMouseCurr = MAKEPOINT (lParam);
/* Remove previous rectangle */
hdc = GetDC (hWnd);
SelectObject (hdc,
GetStockObject (NULL_BRUSH));
SetROP2 (hdc, R2_NOT);
Rectangle (hdc, rObject.left,
rObject.top,
rObject.right,
rObject.bottom);
ReleaseDC (hWnd,hdc); |
|
|
/* Calculate relative movement of mouse
from previous position */
ptOffset.x = ptMouseCurr.x - ptMousePrev.x;
ptOffset.y = ptMouseCurr.y - ptMousePrev.y;
/* determine position for new rectangle */
rObject.left += ptOffset.x;
rObject.top += ptOffset.y;
rObject.right += ptOffset.x;
rObject.bottom += ptOffset.y;
/* Remember mouse point for next mouse move */
ptMousePrev = ptMouseCurr;
/* Draw a new rectangle */
hdc = GetDC (hWnd);
SelectObject (hdc,
GetStockObject (NULL_BRUSH));
SetROP2 (hdc, R2_NOT);
Rectangle (hdc, rObject.left,rObject.top,
rObject.right, rObject.bottom);
ReleaseDC (hWnd,hdc);
}
}
break; |
|
|
case WM_LBUTTONUP:
{
/* release mouse capture */
if(bCapture)
{
ReleaseCapture ();
bCapture = FALSE;
} |
|
|
/* make sure we are dragging a movable object */
if (bDrag)
{
/* remove the rectangle */
hdc = GetDC (hWnd);
SelectObject (hdc,
GetStockObject (NULL_BRUSH));
SetROP2 (hdc, R2_NOT);
Rectangle (hdc, rObject.left, rObject.top,
rObject.right, rObject.bottom);
ReleaseDC (hWnd,hdc);
/* convert rect coord to graph virtual coord */
dvRect(gpDrawEnv, &rObject);
/* move selected object to new position */
MoveSelectedItem(gpDrawEnv,gpGraph,
gpSelItem,&rObject);
/*NEW POSITION*/
/* finished dragging the object */
bDrag = FALSE;
/* force a new drawing of the graph */
InvalidateRect (hWnd, &r, TRUE);
}
}
break;
|
|
|
The following chart objects can be resized dynamically by the user: |
|
|
|
Title, Subtitle, and Footnote |
|
|
|
Row Title, Column Title and Axis Titles |
|
|
|
Graph Frame (the region of the chart that contains the graphed data) |
|
|
|
Legend |
|
|
When one of these objects is selected and highlighted, eight move/resize handles appear on the object's bounding box. These handles allow the user to resize an object by clicking and dragging. The following example code illustrates the use of moving/resizing handles to resize objects in the graph. |
|
|
/* RESIZE AN OBJECT CODE SAMPLE*
* Variables not relevant to resizing an object are not
* included in declarations. For example, detnodes,
* selection list pointers, selection item pointers etc.
*/ |
|
|
/* hit test handle positions */
#define HTTopLeft 0
#define HTTopRight 1
#define HTBottomLeft 2
#define HTBottomRight 3
#define HTCenterTop 4
#define HTCenterRight 5
#define HTCenterLeft 6
#define HTCenterBottom 7 |
|
|
/* previous mouse point before dragging */
POINT ptMousePrev; |
|
|
/* current mouse point position */
POINT ptMouseCurr; |
|
|
/* mouse displacement from previous to current */
POINT ptOffset; |
|
|
/* TRUE-sizing an object */
BOOLEAN bSize = FALSE; |
|
|
/* TRUE-mouse capture is enabled */
BOOLEAN bCapture = FALSE; |
|
|
BOOLEAN bLeft;/* TRUE:left side is getting sized */
BOOLEAN bTop;/* TRUE:top side is getting sized */
BOOLEAN bRight;/* TRUE:right side is getting sized */
BOOLEAN bBottom;/* TRUE:bottom side is getting sized */
RECT rObject;/* sizing rectangle for the object */
RECT rHandle;/* rectangle for the sizing handle */
INT16 nWhich;/* the handle that was hit */
HDC hdc; |
|
|
case WM_LBUTTONDOWN:
{
/* get mouse position and convert to virtual coords */
ptMouseCurr = MAKEPOINT (lParam);
ptMousePrev = ptMouseCurr;
/* did mouse hit a handle in selection list? */
if(gpSelItem = Select_HandleHitTest(
gpList, ptMouseCurr, &nWhich,&rHandle))
{
/* assume nothing is sizeable yet */
bLeft = bTop = bRight = bBottom = 0;
/* determine sides are to be sized */
if( nWhich==HTTopLeft || nWhich==HTCenterTop ||
nWhich==HTTopRight) bTop = TRUE;
if(nWhich==HTTopRight || nWhich==HTCenterRight ||
nWhich == HTBottomRight) bRight = TRUE;
if(nWhich == HTBottomRight ||
nWhich == HTBottomLeft)bBottom = TRUE; |
|
|
if(nWhich==HTBottomLeft || nWhich==HTCenterLeft ||
nWhich == HTTopLeft) bLeft = TRUE;
/* get bounding rectangle for object */
rObject = gpSelItem->rcBounds;
/* convert rectangle to device coords */
vdRect(gpDrawEnv,&rObject);
/* draw a rectangle around the object */
hdc = GetDC (hWnd);
SelectObject (hdc, GetStockObject(NULL_BRUSH));
SetROP2 (hdc, R2_NOT);
Rectangle (hdc, rObject.left, rObject.top,
rObject.right,rObject.bottom);
ReleaseDC (hWnd,hdc);
/* lock all mouse input to our window */
SetCapture (hWnd);
bCapture = TRUE;
/* set flag to know object is sizing */
bSize = TRUE;
}
else
{
/* convert mouse point to virtual coords*/
dvPoint(gpDrawEnv,&ptMouseCurr);
/* Is a det node at this pt?*/
if (FindDetNode(gpGraph,&ptMouseCurr,gpDetNode))
{
/* clear the selection list and
add this new item to list */
Select_ClearList(gpList);
gpSelItem = Select_AddItem(
gpGraph,gpList,gpDetNode);
Select_CalcHandlesItem(gpDrawEnv,gpSelItem);
/* draw xor item to show handles,
if there are any */
hdc = GetDC (hWnd);
DESetPortInfo(gpDrawEnv,hdc,DE_PORT_NORMAL);
DrawBegin(gpDrawEnv);
Select_DrawXorItem(gpDrawEnv,gpSelItem);
DrawEnd(gpDrawEnv);
}
}
}
break; |
|
|
case WM_MOUSEMOVE:
{
/* make sure we are sizing an object */
if (bSize)
{
/* get current mouse position */
ptMouseCurr = MAKEPOINT (lParam);
/* Remove previous rectangle */
hdc = GetDC (hWnd);
SelectObject (hdc, GetStockObject(NULL_BRUSH));
SetROP2 (hdc, R2_NOT);
Rectangle (hdc, rObject.left,rObject.top,
rObject.right, rObject.bottom);
ReleaseDC (hWnd,hdc);
/* Calculate relative movement of mouse
from previous position */
ptOffset.x=ptMouseCurr.x-ptMousePrev.x;
ptOffset.y=ptMouseCurr.y-ptMousePrev.y;
/* determine position for new rect */
if(bLeft)rObject.left+= ptOffset.x;
if(bTop)rObject.top+= ptOffset.y;
if(bRight)rObject.right+= ptOffset.x;
if(bBottom)rObject.bottom+= ptOffset.y;
/* Remember mouse point for next mouse move */
ptMousePrev = ptMouseCurr;
/* Draw a new rectangle */
hdc = GetDC (hWnd);
SelectObject (hdc,GetStockObject (NULL_BRUSH));
SetROP2 (hdc, R2_NOT);
Rectangle (hdc, rObject.left, rObject.top,
rObject.right,rObject.bottom);
ReleaseDC (hWnd,hdc);
}
}
break; |
|
|
case WM_LBUTTONUP:
{
/* release mouse capture */
if(bCapture)
{
ReleaseCapture ();
bCapture = FALSE;
}
/* make sure we are sizing an object */
if (bSize)
{
/* remove the rectangle */
hdc = GetDC (hWnd);
SelectObject (hdc,
GetStockObject (NULL_BRUSH));
SetROP2 (hdc, R2_NOT);
Rectangle (hdc, rObject.left, rObject.top,
rObject.right, rObject.bottom);
ReleaseDC (hWnd,hdc);
/* convert the rectangle coordinates to
graph virtual coordinates */
dvRect(gpDrawEnv, &rObject);
/* move selected object to new position */
MoveSelectedItem(gpDrawEnv,gpGraph,
gpSelItem,&rObject);
/*NEW POSITION*/
/* finished dragging the object */
bSize = FALSE;
/* force a new drawing of the graph */
InvalidateRect (hWnd, &r, TRUE);
}
}
break; |
|
|
A single attribute can be used to change the entire appearance of a graph. However, note that in many cases the new graph type must also be accompanied by a data format specification that defines the format of data coming into the graph. The following attributes are used to specify a graph type and the format of data coming into it: |
|
|
|
A_GRAPH_PRESET: sets the graph type and subtype |
|
|
|
A2D_DATAFORMAT: sets the data format for a 2D graph |
|
|
|
A3D_DATAFORMAT: sets the data format for a 3D graph |
|
|
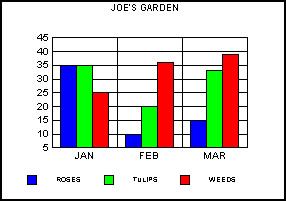
The A_GRAPH_PRESET attribute can be set to a major graph type (bar, line, 2D, 3D, etc.) and a minor graph sub-type (side-by-side dual-Y, vertical absolute, etc.). The two values determine the general appearance of the entire graph. The A2D_DATAFORMAT and A3D_DATAFORMAT attributes define the format of data coming into the graph. These attributes are set to a single INT16 value that defines each data value coming into the graph. For example, when A2D_DATAFORMAT is set to zero, it indicates that each value coming into the graph represents a data point to be charted. The following example array of data values would chart a graph of four groups with four series in each group. |
|
|
int NumData [4][4] =
{
{100,200,300,400},
{500,600,700,800},
{900,1000,1100,1200},
{1300,1400,1500,1600}
}; |
|
|
If A2D_DATAFORMAT is set to one for a simple 2D bar graph, this same array of data values will be interpreted differently. The first value is interpreted as a data point to be charted and the second value is interpreted as a label associated with the data point. This results in a graph with two groups and four series in each group (200 is the label for data point value 100, 400 is the label for data point 300, etc.). The range of format values that can be specified depend on the graph type selected by A_GRAPH_PRESET. Some graph types require more than a single value to define each data point (e.g., a Stock Market graph requires at least an open and close value). See A2D_DATAFORMAT and A3D_DATAFORMAT in the PGSDK Attributes Guide for details. |
|
|
The following examples show the different kinds of graphs that are produced using the same array of data values and different A_GRAPH_PRESET and A2D_DATAFORMAT values. Most of these examples also set A2D_SHOW_DATATEXT attribute to more clearly illustrate values in the NumData[] array that are used to chart the graph. |
|
|
// Define data values to chart the graph
int NumData [4][4] = {
{100,200,300,400},
{500,600,700,800},
{900,1000,1100,1200},
{1300,1400,1500,1600}
};
// Array of different kinds of graphs to generate
static TDG_GraphPresetInfo GraphTable [12] =
{
{TDG_GRAPH_BARS , 8}, /* Side-by-Side Bar Graph */
{TDG_GRAPH_LINES, 0}, /* Line Graph */
{TDG_GRAPH_AREA , 4}, /* Stacked Area Graph */
{TDG_GRAPH_3D , 0}, /* 3D Graph */
{TDG_GRAPH_PIE, 0}, /* Pie Graph */
{TDG_GRAPH_BARS, 4}, /* Stacked Bar Graph */
{TDG_GRAPH_BARS, 12}, /* Percent Bar Graph */
{TDG_GRAPH_SPECIAL, 3}, /* Scatter Graph */
{TDG_GRAPH_BARS, 6}, /* Stacked BiPolar Graph */
{TDG_GRAPH_BARS, 7}, /* Stacked Dual-Y BiPolar */
{TDG_GRAPH_PIE, 6}, /* Pie Bar Graph */
{TDG_GRAPH_SPECIAL, 5} /* Stock Market Graph */
}; |
|
|
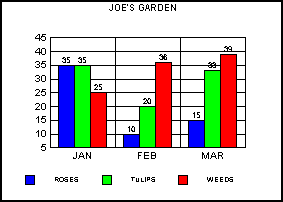
Example 1: The following example code creates a side-by-side bar graph using data format zero (value only): |
|
|
//Data Format for Value Only
INT16 nDFValue = 0;
// Side-by-Side Bar Graph
INT16 iGraph = 0;
SetGraphAttr(gpGraph,GRAPH_LAYER,
NULL_OBJECTID, NULL_SERIESID, NULL_GROUPID,
A2D_DATAFORMAT,&nDFValue);
SetGraphAttr (gpGraph, GRAPH_LAYER,
NULL_OBJECTID, NULL_SERIESID, NULL_GROUPID,
A_GRAPH_PRESET, &GraphTable[iGraph]); |
|
|
|
|
|
Example 2: The following example code creates a side-by-side bar graph using data format one (value and label): |
|
|
//Data Format for Value and Label
INT16 nDFValue = 1;
// Side-by-Side Bar Graph
INT16 iGraph = 0;
SetGraphAttr(gpGraph,GRAPH_LAYER,
NULL_OBJECTID, NULL_SERIESID, NULL_GROUPID,
A2D_DATAFORMAT,&nDFValue);
SetGraphAttr(gpGraph, GRAPH_LAYER,
NULL_OBJECTID, NULL_SERIESID, NULL_GROUPID,
A2D_SHOW_DATATEXT, &bTRUE);
SetGraphAttr (gpGraph, GRAPH_LAYER,
NULL_OBJECTID, NULL_SERIESID, NULL_GROUPID,
A_GRAPH_PRESET, &GraphTable[iGraph]); |
|
|
|
|
|
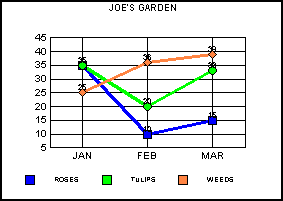
Example 3: The following example code creates a line graph using data format zero (value only): |
|
|
INT16 nDFValue = 0; /* Value Only */
INT16 iGraph = 1; /* Line Graph */
SetGraphAttr(gpGraph,GRAPH_LAYER,
NULL_OBJECTID, NULL_SERIESID, NULL_GROUPID,
A2D_DATAFORMAT,&nDFValue);
SetGraphAttr(gpGraph, GRAPH_LAYER,
NULL_OBJECTID, NULL_SERIESID, NULL_GROUPID,
A2D_SHOW_DATATEXT, &bTRUE);
SetGraphAttr (gpGraph, GRAPH_LAYER,
NULL_OBJECTID, NULL_SERIESID, NULL_GROUPID,
A_GRAPH_PRESET, &GraphTable[iGraph]); |
|
|
|
|
|
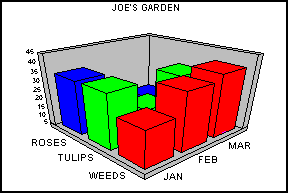
Example 4: The following example code creates an stacked area graph using data format zero (value only): |
|
|
INT16 nDFValue = 0; /* Value Only */
INT16 iGraph = 2; /* Stacked Area Graph */
SetGraphAttr(gpGraph,GRAPH_LAYER,
NULL_OBJECTID, NULL_SERIESID, NULL_GROUPID,
A2D_DATAFORMAT,&nDFValue);
SetGraphAttr(gpGraph, GRAPH_LAYER,
NULL_OBJECTID, NULL_SERIESID, NULL_GROUPID,
A2D_SHOW_DATATEXT, &bTRUE);
SetGraphAttr (gpGraph, GRAPH_LAYER,
NULL_OBJECTID, NULL_SERIESID, NULL_GROUPID,
A_GRAPH_PRESET, &GraphTable[iGraph]); |
|
|

|
|
|
Example 5: The following example code creates a 3D graph using data format zero (value only): |
|
|
INT16 nDFValue = 0; /* Value Only */
INT16 iGraph = 3; /* 3D Graph */
SetGraphAttr(gpGraph,GRAPH_LAYER,
NULL_OBJECTID,NULL_SERIESID, NULL_GROUPID,
A3D_DATAFORMAT,&nDFValue);
SetGraphAttr(gpGraph, GRAPH_LAYER,
NULL_OBJECTID, NULL_SERIESID, NULL_GROUPID,
A2D_SHOW_DATATEXT, &bTRUE);
SetGraphAttr (gpGraph, GRAPH_LAYER,
NULL_OBJECTID, NULL_SERIESID, NULL_GROUPID,
A_GRAPH_PRESET, &GraphTable[iGraph]); |
|
|
|
|
|
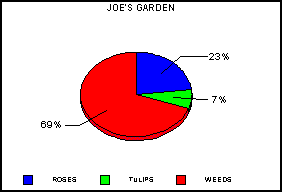
Example 6: The following example code creates a Pie graph using data format zero (value only): |
|
|
INT16 nDFValue = 0; /* Value Only */
INT16 iGraph = 4; /* Pie Graph */
SetGraphAttr(gpGraph,GRAPH_LAYER,
NULL_OBJECTID,NULL_SERIESID, NULL_GROUPID,
A2D_DATAFORMAT,&nDFValue);
SetGraphAttr(gpGraph, GRAPH_LAYER,
NULL_OBJECTID, NULL_SERIESID, NULL_GROUPID,
A2D_SHOW_DATATEXT, &bTRUE);
SetGraphAttr (gpGraph, GRAPH_LAYER,
NULL_OBJECTID, NULL_SERIESID, NULL_GROUPID,
A_GRAPH_PRESET, &GraphTable[iGraph]); |
|
|
|
|
|
Example 7: The following example code creates a 2D Scatter graph using data format one (value X and value Y): |
|
|
INT16 nDFValue = 1; /* Value X & Value Y */
INT16 iGraph = 7; /* 2D Scatter Graph */
SetGraphAttr(gpGraph,GRAPH_LAYER,
NULL_OBJECTID, NULL_SERIESID, NULL_GROUPID,
A2D_DATAFORMAT,&nDFValue);
SetGraphAttr(gpGraph, GRAPH_LAYER,
NULL_OBJECTID, NULL_SERIESID, NULL_GROUPID,
A2D_SHOW_DATATEXT, &bTRUE);
SetGraphAttr (gpGraph, GRAPH_LAYER,
NULL_OBJECTID, NULL_SERIESID, NULL_GROUPID,
A_GRAPH_PRESET, &GraphTable[iGraph]); |
|
|
|
|
|
Example 8: The following example code creates a Stacked Bar graph using data format zero (value only): |
|
|
INT16 nDFValue = 0;/* Value Only */
INT16 iGraph = 5;/* Stacked Bar Graph */
SetGraphAttr(gpGraph,GRAPH_LAYER,
NULL_OBJECTID, NULL_SERIESID, NULL_GROUPID,
A2D_DATAFORMAT,&nDFValue);
SetGraphAttr(gpGraph, GRAPH_LAYER,
NULL_OBJECTID, NULL_SERIESID, NULL_GROUPID,
A2D_SHOW_DATATEXT,&bTRUE);
SetGraphAttr (gpGraph, GRAPH_LAYER,
NULL_OBJECTID, NULL_SERIESID, NULL_GROUPID,
A_GRAPH_PRESET, &GraphTable[iGraph]); |
|
|
|
|
|
Example 9: The following example code creates a Stacked Percent Bar graph using data format one (value and label): |
|
|
//Value and Label
INT16 nDFValue = 1;
//Stacked Percent Bar Graph
INT16 iGraph = 6;
SetGraphAttr(gpGraph,GRAPH_LAYER,
NULL_OBJECTID,NULL_SERIESID, NULL_GROUPID,
A2D_DATAFORMAT,&nDFValue);
SetGraphAttr(gpGraph, GRAPH_LAYER,
NULL_OBJECTID, NULL_SERIESID, NULL_GROUPID,
A2D_SHOW_DATATEXT, &bTRUE);
SetGraphAttr (gpGraph, GRAPH_LAYER,
NULL_OBJECTID, NULL_SERIESID, NULL_GROUPID,
A_GRAPH_PRESET, &GraphTable[iGraph]); |
|
|
|
|
|
Example 10: The following example code creates a Stacked BiPolar Bar graph using data format zero (value only): |
|
|
INT16 nDFValue = 0;/* Value Only */
INT16 iGraph = 8; /* Stacked BiPolar Bar */ GraphSetGraphAttr(gpGraph,GRAPH_LAYER,
NULL_OBJECTID,NULL_SERIESID,NULL_GROUPID,
A2D_DATAFORMAT,&nDFValue);
SetGraphAttr(gpGraph, GRAPH_LAYER,
NULL_OBJECTID,NULL_SERIESID,NULL_GROUPID,
A2D_SHOW_DATATEXT, &bTRUE);
SetGraphAttr (gpGraph, GRAPH_LAYER,
NULL_OBJECTID, NULL_SERIESID,NULL_GROUPID,
A_GRAPH_PRESET, &GraphTable[iGraph]); |
|
|
|
|
|
The numeric values that may be drawn in a chart can be: |
|
|
|
Numeric axis (X, Y1, Y2, Z) labels |
|
|
|
Numeric axis data text (i.e. data values from the data source displayed next to risers or markers) |
|
|
|
Formula and correction coefficient values displayed in conjunction with series-dependent trend lines |
|
|
All of these values can be formatted using the one of the predefined format supplied with the PGSDK library or using advanced user-defined custom formatting. |
|
|
Use one of the following attributes to select one of the predefined formats: |
|
|
|
A2D_FORMAT_SDLINE; Formats the formula and coefficient values that may be displayed with a series-dependent line. |
|
|
|
A2D_FORMAT_X; Formats numeric labels on the X-axis. |
|
|
|
A2D_FORMAT_Y1; Formats numeric labels on the Y1-axis. |
|
|
|
A2D_FORMAT_Y2; Formats numeric labels on the Y2-axis. |
|
|
|
A2D_FORMATDTXT_X; Formats an instance of numeric data text on the X-axis. |
|
|
|
A2D_FORMATDTXT_Y1; Formats an instance of numeric data text on the Y1-axis. |
|
|
|
A2D_FORMATDTXT_Y2; Formats an instance of numeric data text on the Y2-axis. |
|
|
When one of these attributes is used to apply the format, one of the following standard formats can be selected: |
|
|
1= |
General (e.g., 1,000,000 = 1000000) |
|
|
2= |
0 (e.g., 1,000,000 = 1000000) |
|
|
3= |
0.0 (e.g., 1,000,000 = 1000000.0) |
|
|
4= |
0.00 (e.g., 1,000,000 = 1000000.00) |
|
|
5= |
#,##0 (e.g., 1,000,000 = 1,000,000) |
|
|
6= |
#,##0.00 (e.g., 1,000,000 = 1,000,000.00) |
|
|
7= |
$0 (e.g., 1,000,000 = $1000000) |
|
|
8= |
$0.00 (e.g., 1,000,000 = $1000000.00) |
|
|
9= |
$#,##0 (e.g., 1,000,000 = $1,000,000) |
|
|
10= |
$#,##0.00 (e.g., 1,000,000 = $1,000,000.00) |
|
|
11= |
0% (e.g., 1,000,000 = 100000000%) |
|
|
12= |
0.0% (e.g., 1,000,000 = 100000000.0%) |
|
|
13= |
0.00% (e.g., 1,000,000 = 100000000.00%) |
|
|
14= |
%0 (e.g., 1,000,000 = %100000000) |
|
|
15= |
%0.0 (e.g., 1,000,000 = %100000000.0) |
|
|
16= |
%0.00 (e.g., 1,000,000 = %100000000.00) |
|
|
17= |
0.0E+00 (e.g., 1,000,000 = 1.0E+6) |
|
|
18= |
0.00E+00 (e.g., 1,000,000 = 1.00E+6) |
|
|
19= |
0.000E+00 (e.g., 1,000,000 = 1.000E+6) |
|
|
20= |
0.0e+00 (e.g., 1,000,000 = 1.0e+6) |
|
|
21= |
0.00e+00 (e.g., 1,000,000 = 1.00e+6) |
|
|
22= |
0.000e+00 (e.g., 1,000,000 = 1.000e+6) |
|
|
23= |
0K (e.g., 1,000,000 = 1000K) |
|
|
24= |
0.00K (e.g., 1,000,000 = 1000.00K) |
|
|
25= |
#,##0K (e.g., 1,000,000 = 1,000K) |
|
|
26= |
#,##0.00K (e.g., 1,000,000 = 1,000.00K) |
|
|
27= |
K0 (e.g., 1,000,000 = K1000) |
|
|
28= |
K0.00 (e.g., 1,000,000 = K1000.00) |
|
|
29= |
K#,##0 (e.g., 1,000,000 = K1,000) |
|
|
30= |
K#,##0.00 (e.g., 1,000,000 = K1,000.00) |
|
|
31= |
$0K (e.g., 1,000,000 = $1000K) |
|
|
32= |
$0.00K (e.g., 1,000,000 = $1000.00K) |
|
|
33= |
$#,##0K (e.g., 1,000,000 = $1,000K) |
|
|
34= |
$#,##0.00K (e.g., 1,000,000 = $1,000.00K) |
|
|
35= |
0M (e.g., 1,000,000,000 = 1000M) |
|
|
36= |
0.00M (e.g., 1,000,000,000 =1000.00M) |
|
|
37= |
#,##0M (e.g., 1,000,000,000 =1,000M) |
|
|
38= |
#,##0.00M (e.g., 1,000,000,000 =1,000.00M) |
|
|
39= |
M0 (e.g., 1,000,000,000 = M1000) |
|
|
40= |
M0.00 (e.g., 1,000,000,000 = M1000.00) |
|
|
41= |
M#,##0 (e.g., 1,000,000,000 = M1,000) |
|
|
42= |
M#,##0.00 (e.g., 1,000,000,000 = M1,000.00) |
|
|
43= |
$0M (e.g., 1,000,000,000 = $1000M) |
|
|
44= |
$0.00M (e.g., 1,000,000,000 = $1000.00M) |
|
|
45= |
$#,##0M (e.g., 1,000,000,000 = $1,000M) |
|
|
46= |
$#,##0.00M (e.g., 1,000,000,000 = $1,000.00M) |
|
|
47= |
hh:mm AM/PM |
|
|
48= |
hh:mm:ss AM/PM |
|
|
49= |
HH:mm (HH= 24-hour format) |
|
|
50= |
Current Locale Short Date format (LOCALE_SSHORTDATE) |
|
|
51= |
Current Locale Long Date format (LOCALE_SLONGDATE) |
|
|
52= |
if LOCALE_IDATE is 0 or 1, MMM yy. if LOCALE_IDATE is 2, yy MMM |
|
|
53= |
if LOCALE_IDATE is 0, MMM dd , yy. if LOCALE_IDATE is 1, dd MMM yy. |
|
|
|
if LOCALE_IDATE is 2, yy MMM dd |
|
|
54= |
if LOCALE_IDATE is 0, MMM dd, if LOCALE_IDATE is 1, dd MMM. |
|
|
|
if LOCALE_IDATE is 2, MMM dd |
|
|
55= |
if LOCALE_IDATE is 0, MMM dd yy hh:mm AM/PM |
|
|
|
if LOCALE_IDATE is 1, dd MMM yy HH:mm (HH=24-hour format) |
|
|
|
if LOCALE_IDATE is 2, yy MMM dd HH:mm (HH=24-hour format) |
|
|
61= |
Trigger RealToString Callback Function |
|
NOTE: |
The LOCALE_xxxxxxx values are Win32 locale constants, which can be queried by calling the Win32 API: GetLocaleInfo. Please see Win32 API Doc. |
|
|
Use one of the following attributes to define a custom value format string: |
|
|
|
A2D_FORMAT_SDLINE_ADV; Formats the formula and coefficient values that may be displayed with a series-dependent line. |
|
|
|
A2D_FORMAT_X_ADV; Formats numeric labels on the X-axis. |
|
|
|
A2D_FORMAT_Y1_ADV; Formats numeric labels on the Y1-axis. |
|
|
|
A2D_FORMAT_Y2_ADV; Formats numeric labels on the Y2-axis. |
|
|
|
A2D_FORMATDTXT_X_ADV; Formats an instance of numeric data text on the X-axis. |
|
|
|
A2D_FORMATDTXT_Y1_ADV; Formats an instance of numeric data text on the Y1-axis. |
|
|
|
A2D_FORMATDTXT_Y2_ADV; Formats an instance of numeric data text on the Y2-axis. |
|
|
If one of these attributes is used to format numeric values, use the AdvFormatStruct data structure to define a custom number format. |