 TDGDataGrid
Handling
Large Data Sets The
Callback Technique Individual
Values Support
Methods Data
Scrolling Data
Zooming Data
in a 3D Chart Data
in Bar/Line/Area Charts Data
in Pie Charts Data
in XY Scatter Charts Data
in XY Scatter with Labels Chart Data
in Polar Charts Data
in Radar Charts Spectral
Map Data Bubble
Chart Data Data
in Funnel Charts Data
in Gantt Charts Data
in Multi-Y Charts Data
in Pareto Charts Data
in Waterfall Charts Data
in Stock Charts
TDGDataGrid
Handling
Large Data Sets The
Callback Technique Individual
Values Support
Methods Data
Scrolling Data
Zooming Data
in a 3D Chart Data
in Bar/Line/Area Charts Data
in Pie Charts Data
in XY Scatter Charts Data
in XY Scatter with Labels Chart Data
in Polar Charts Data
in Radar Charts Spectral
Map Data Bubble
Chart Data Data
in Funnel Charts Data
in Gantt Charts Data
in Multi-Y Charts Data
in Pareto Charts Data
in Waterfall Charts Data
in Stock Charts
One of the first things you may want to do with Perspective for Java is import your own data into a chart. Perspective provides built-in sample data that will be used until and unless you set up your own data source. The sample data is used so that you can insert the Bean or Applet into a development environment or web page and instantly see a chart without connecting your own data.
Perspective for Java supports several methods for connecting your data. One of them will be the most useful for your own situation. The easiest method is to simply load the data from a text file on your server; the most complex is to set up a callback mechanism between Perspective for Java and your own Java applet. The current methods are:
- Load Data from a server-based text file
- Place data directly within your HTML page
- Load data using an SQL query to any JDBC/OCBC compliant database
- Pass a data object from another Java class or applet
- Register a data object within your own class to "feed" data automatically to Perspective for Java
- Set individual values for the chart within your Java code
Part and parcel of the "data" are the strings for Title, Subtitle, Footnote, the various axis titles, and the strings for the Series (legend text) and Groups (bottom ordinal axes) of your chart. Some of these methods allow you to pass Series and Group labels along with the data, but all require that you separately set strings for the Titles.
Text files are used by many web server applications. Any CGI or PERL script can create text files using the simple I/O types built-in, and many programmers like to collect their data into a text file in order to pass it along to the next application. Perspective for Java includes the ability to directly load any data text file, whether it was created via CGI or PERL methods or exported from a spreadsheet application.
You can load any text file into Perspective using the setDataFileURL() or setDataFile() method. The input parameter for setDataFileURL() can be any valid file location or Internet URL. The input parameter for setDataFile() can be any valid file location.
The text file needs to be organized in "spreadsheet" fashion with rows of numbers for series and columns of numbers for groups. Optionally, you can supply row and/or column headers that can be used for labeling the series and groups. Each value must be separated by a comma, and each text value must be in quotes. However, if you ARE supplying row and column headers, the very first word in the file must be "labels", in quotes, separated by a comma.
The following is an example of the contents of a valid data file. Files of this type are often referred to as Comma Separated Values (CSV) files. Excel (or any other spreadsheet application) can export data directly into this format:
Here is the same file without the labels:
You can replace it with any data you want and the function will work the same. Files can be any name, any length, any location, and any number of values.
EXAMPLE:
restoreDefaults();
setGraphType (41);
setDepthAngle (0);
setDepthRadius (0);
setUseSampleData (false);
setDataFile ("A:/dataset1.txt");
The dataset1.txt file contains the following values:
Note that the setDataFile() method will NOT work in a secure environment where files cannot just be accessed (like an applet in a browser's sandbox).
For a quick example of how to do this, select the View Source option on any of the "live demo" pages. The setDataSeries() method that is only available in HTML can be used to assign a list of real numbers to one or more series in a chart. The following example HTML illustrates how this method is used to assign data values to a sequential set of series in a BiPolar chart:
EXAMPLE:
<HTML>
<HEAD>
<TITLE>TDGChartApplet</TITLE>
</HEAD>
<BODY>
<APPLET CODE="TDGChartApplet.class" WIDTH=484 HEIGHT=410>
<PARAM name=TDGSCRIPT value='setGraphType (21); /* set graph type */
     setTitleString ("Wilde Java Jon!");
     setSeriesLabelArray ("Retail Cost","Dealer Cost","Seats"); /* Set Data Series 0 */
     setDataSeries (45319.00,5610.00,51065.00,6478.00,64732.00); /* Set Data Series 1 */
     setDataSeries (37853.00,4631.00,41235.00,5512.00,54563.00); /* Set Data Series 2 */
     setDataSeries (15.00,5.00,10.00,8.00,34.00); /* set group labels */
     setGroupLabelArray ("England","France","Italy","Japan","W Germany");
     setX1TitleString ("Country");
     setFootnoteString ("A Very Good Footnote");
     setURL (0,0, "http://www.threedgraphics.com");
     setURL (0,1, "http://www.threedgraphics.com");
     setURL (0,2, "http://www.threedgraphics.com");
     setURL (1,0, "http://www.threedgraphics.com");
     setAxisAssignment (0, 0);/* put series 0 on Y1 */
     setAxisAssignment (1, 0);/* put series 1 on Y1 */
     setAxisAssignment (2, 1);/* put series 2 on Y2 */'>
</APPLET>
</BODY>
</HTML>
The setDataFromSQL() method loads graph columns and rows in the given query. It creates a result set and closes the result set.
EXAMPLE:
{
    String Harry = textField1.getText();
    if (Harry.length() > 0)
    {
    // assumes current connection to DataSource through JDBC
    m_Chart.setDataFromSQL (Harry, stmt);
    }
}
The setDataFromResultSet() method loads graph columns and rows in the given result set. The result set is not closed.
The following methods can be used to determine SQL data types:
- isSQLTypeNumeric (int SQLType): This method returns a value that indicates whether or not SQLType is an SQL numeric data type.
- isSQLTypeString (int SQLType): This method returns a value that indicates whether or not SQLType is an SQL string data type.
When loading data from Java, use one of these methods:
- The TDGDataGrid Interface
- The CallBack Technique (setDataFromCallBack())
- Individual Values (setData (row, column, value);)
TDGDataGrid is series of methods that you must implement into an object. You can have any number of other methods or functions inside this object. See TDGDataGrid Methods for a description of the methods that must be included in the object.
Perspective will get data from this object based on how your application implements these methods. It does not matter how you process, parse, or access your data. However, these methods must be made public so that Perspective can access them to retrieve data.
For large data sets, you may also implement the optional TDGPreScaleIF interface that lets you define how minimum and maximum scaling values are handled. See Handling Large Data Sets with TDGPreScaleIF.
TDGPreScaleIF is an optional callback interface that users with large datasets may implement in their existing data callbacks (TDGDataGrid) to expedite processing of data. See Chapter 10 for a description of the methods in this interface.
The setDataFromCallback() method can be used to load data from a predefined data grid.
grid: This parameter must identify an interface that represents an abstract data model that defines one way of preparing data.
setDataFromCallBack() can be used to enable the chart data to be slaved to an arbitrary Java Object which implements the TDGDataGrid Interface. When a "callback" is in effect and the chart needs to be redrawn (e.g., after a property is changed), the chart will query the "isDirty()" method of the Java Object.
If the result is true, Perspective will call methods on the Java Object to gather all of the data required to draw the chart. The Java Object may be a remote object through Remote Method Invocation (RMI) or may obtain data through JDBC or any other means as long as it implements the TDGDataGrid Interface.
EXAMPLE:
void button2_Action (java.awt.event.ActionEvent event)
{    // register data source with Perspective for Java
    m_MyDataSource = new MyDataSource();
    m_chart.setDataFromCallBack (m_MyDataSource);
}
Use these properties and methods to load data using individual values:
- UseSampleData (true/false)
- setData (int row, int col, double fValue): This method sets the data value for a series/group intersection. When this method is used to assign individual values to series and groups, the setDataRangeToExtent() method must be used after the last setData() in order for the data to be applied to the chart. If setDataRangeToExtent() is not used, Perspective will display the message "not enough data to draw chart".
- setSeriesLabel (int seriesID, String newValue)
- setGroupLabel (int groupID, String newValue)
- setDataRangeToExtent():This method sets the range of data to be used in the chart according to the number of values identified by the setData() method. It must be used after any setData() operations.
The first thing to do is to turn off the sample data set with the UseSampleData property:
To set a data cell to 100, for example, just set that to the proper row/col address. The first address is 0 for both. So, if we want to set the value 100 for the zero row and zero column (the first riser in the chart), do this:
To set the second item in the row (the next riser in the same series) to 132, do this:
A FOR loop can be used for an array of the whole data set in question.
After all values have been set with setData(), use the following method to apply all the data to the chart.
If setDataRangeToExtent() is not used, Perspective will display the message "not enough data to draw chart".
For labels, there are series labels (i.e., "row labels") and group labels (i.e., "column labels"). Here, you need only specify the series or group number, plus the text string for the label. In the following example, the label for the zero series is set to "Fred":
The following example sets the group label for group zero to "March":
Regardless of the method you use to import data into the chart, these properties and methods can be used to set, clear, and manage data in the chart:
- clearDataLabels(): This method clears all labels from the look, not from the data.
- clearDataStorage(): This method clears all data storage in a chart.
- clearGroupLabels(): This method clears all group labels in a chart.
- clearSeriesLabels(): This method clears all series labels in a chart.
- DataItemsAlongSeries; This property determines whether data items are aligned parallel to the series (both rows or both columns).
- getChartDataValid(): This method determines whether or not chart data is valid.
- getDataAsDouble (int row, int col): This method gets the numeric value for any series/group intersection.
- getDataAsString (int row, int col): This method gets a value for any series/group intersection and converts it to a string.
- getDataCoord (IdentObj id): This method gets the coordinates of an object in a chart.
- getDataFromCoord (IdentObj id, int nCoordVC): This method gets a data value for an object at a specified coordinates in a chart.
- getDataValue (IdentObj id): This method gets a data value for a specific data object (riser) in a chart.
- InterpretAsHLOC; This property is included in Perspective to support backward compatibility with Open-Hi-Lo-Close datasets created for Three |D| Graphics Presentation Graphics Software Development Kit (PGSDK).
- setDataFileURL (String aDataFileURL): Set data from a URL.
- setDataFromDataGrid (TDGDataGrid grid): Set data using a predefined data grid.
- setDataLabel (int s, int g, String newValue); Set a data label for a series (s) and group (g).
- setDataRange(): This method establishes the range of data that will be used in a chart.
- setDataValue (IdentObj id, double newValue): This method sets a data value for a specific data object (riser) in a chart.
The following properties are used to define chart-wide titles:
The following properties are used to define chart axis titles:
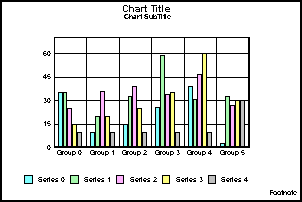
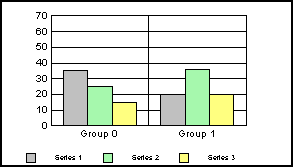
Regardless of the data that assigned to each series/group, the range of data that is imaged on a numeric axis can be limited by the {Axis}ScaleMin and {Axis}ScaleMax properties. For example, the sample data used for a simple vertical bar graph creates a chart in the following format:
The Y1ScaleMax, Y1ScaleMaxAuto, Y1ScaleMin, and Y1ScaleMinAuto properties can be used to modify the range of values displayed on the Y1 axis as shown in the following example:
EXAMPLE:
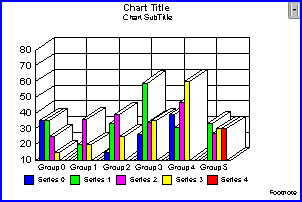
When these properties are set, the chart is imaged in the following format:
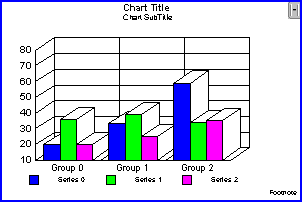
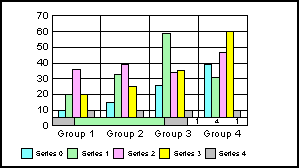
The setDataRange() method can be used to limit the number of series/groups (rows/columns) that are imaged in the chart.
EXAMPLE:
The following properties can also be used to limit the range of data that is imaged in the chart:
- ScrollOffsetGroup: This property specifies the first group to be imaged in the chart.
- ScrollOffsetSeries: This property specifies the first series to be imaged in the chart.
- ViewableGroups: This property specifies the maximum number of groups to be imaged in the chart.
- ViewableGroupsStock: This property specifies the maximum number of groups to be imaged in a stock chart.
- ViewableSeries: This property specifies the maximum number of series to be imaged in the chart.
- ViewableSeriesStock: This property specifies the maximum number of series to be imaged in a stock chart.
EXAMPLE:
When the number of viewable groups or series is set to a value less than the number of groups/series in the data set that defines the chart, you can use these properties to display data scroll bars in the chart:
- DataScrollerPresenceGroups: This property controls the presence of data scroll bars on the group axis. When the number of viewable groups is set to a value less than the number of groups in the data set, the scroll bar can be used to change the first group in the chart that is displayed (i.e., effectively changes the value assigned to ScrollOffsetGroup).
- DataScrollerPresenceSeries: This property controls the presence of data scroll bars on the series axis. When the number of viewable series is set to a value less than the number of series in the data set, the scroll bar can be used to change the series group in the chart that is displayed (i.e., effectively changes the value assigned to ScrollOffsetSeries).
EXAMPLE:
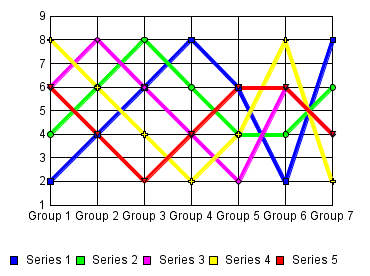
The data scroller bar consists of two segments: 1) a segment that can be used to click and drag to the first group to be displayed and 2) a status bar that shows the number of the first group (i.e., the ScrollOffsetGroup value), the total number of viewable groups, and the remaining number of groups in the data set. In the first segment, the darker, movable thumb can be dragged to change the group offset. In the second segment, the total of the three numbers indicates the total number of groups defined in the data set. For example, the status area of the scroll bar displays "2 3 1". These numbers indicate that ScrollOffsetGroup is "2", ViewableGroups is "3", there is "1" group in the data set that is not displayed, and there are a total of six groups defined in the data set. The user can click on these numbers and edit them with the arrow keys.
The following properties and methods can be used to zoom in, zoom out, and define data zooming parameters:
- clearZoomList(): This method clears all entries in the zoom list and returns the chart to its original un-zoomed state.
- doZoomIn(): This method can be used to zoom in on the center of the chart, a given point (in x,y virtual coordinates), or a rectangle. The ZoomPercentage property identifies the amount of zoom.
- doZoomOut(): This method can be used to zoom out on the center of the chart or a given point (in x,y virtual coordinates). The ZoomPercentage property identifies the amount of zoom.
- get/setZoomIndex(): This method gets/sets the current zoom state index. It sets the "level" of zooming to go to. Only values inside the current zoom index may be used. Use isValidZoomIndex() to determine if the zoom index value is valid.
- isValidZoomIndex (value): This method returns true or false indicating whether or not value is a valid zoom index.
- isZoomingArmed(): This method returns true or false indicating whether or not at least one zooming operating has been performed on the chart.
- ZoomDirection: This property selects the direction (X-axis, Y-Axis, or both) in which data zooming operations are performed by doZoomIn() and doZoomOut().
- ZoomPercentage: This property specifies the percentage of zoom to be performed by doZoomIn() and doZoomOut().
In addition to these properties and methods, you can also enable data zooming and scrolling via the user interface with the SelectionEnable property. When setSelectionEnable (5) is used, zooming and scrolling functions are enabled. When this mode is used, it allows the user to drag out a rectangle and drill-down on the data within the rectangle area. A single mouse click will back up one data-zoom level or drill-down. Double click will restore the original un-zoomed data state. Note that user interface-based zooming and scrolling is mutually exclusive with selecting chart items. When setSelectionEnable (5) is used, chart objects cannot be selected.
When data zooming is enabled with the zoom properties/methods or via the user interface, Perspective will maintain a Zoom Index that keeps track of the number of times a chart has been zoomed in and the state of zooming. As an example, assume ZoomPercentage is set to 10%, and the user clicks ONCE. The chart is now zoomed to 90% of its original values, and the Zoom Index is now 1. Now the user clicks A SECOND TIME. The chart is now zoomed to 80% of its orignal values, and the zoom index now is 2. Or, actually, the zoom index now has TWO entries: one for the first, 90% state, and a second for the second, 80% state.
You can keep adding to the zoom index as the user contines to click. Continuing with the example and the same values, assume the user has clicked eight consecutive times. The Zoom index now contains eight items:
- First Level: Zoom Factor 90%
- Second Level: Zoom Factor 80%
- Third Level: Zoom Factor 70%
- Fourth Level: Zoom Factor 60%
- Fifth Level: Zoom Factor 50%
- Sixth Level: Zoom Factor 40%
- Seventh Level: Zoom Factor 30%
- Eighth Level: Zoom Factor 20%
Your application can go back and forth in this list. For example, assume you want to switch from the "current" level (the last level the user clicked, the eighth zoom level which currently shows 20% of the original unzooomed state). setZoomIndex (4) can be used to IMMEDIATELY switch to the FOURTH level which had a zoom factor of 60%. You can use setZoomIndex() to switch back and forth between any zoom level set.
By default, the following rules govern how missing data points are handled by Perspective for Java:
- When a data point is part of a cumulative total (stacked or percent Bar, Line, Area, pie slice), it is interpreted as 0.0.
- When a data point is used with neighboring points to define a line segment or surface (3D connected, 3D surface, 2D line, 2D area), it is interpreted as 0.0.
- Otherwise (2D side-by-side bar, 3D riser, 3D floating, 2D and 3D scatter, stock charts, spectral map, histogram), the (missing) point will not be plotted.
The FillMissingData and NumMissingDataSegments properties can be used override these rules and define how missing data points are handled.
Regardless of the data import method, data will be interpreted differently based on the selected graph type. The following table shows the data values that are required for each graph type:
Graph Type
Required Data Values per Row (Series)
3D (0...16)
ONE value per marker
2D (17...54)
ONE value per marker
Pie (55...60)
ONE value per marker
XY Scatter (61...62)
TWO values per marker, X and Y, in that order.
XY Scatter with Labels (63...64)
THREE values per maker, X, Y and text label, in that order. Each XY point is discreetly labeled.
Polar (65...66)
TWO values per marker in the following order: X (degree) and Y (distance from the center)
Radar (67...69)
ONE value per marker
Candle: Open/High/Low/Close (70)
FOUR values per marker: Open, High, Low, and Close, in that order.
Candle: Open/High/Low/Close/Volume (71)
FIVE values per marker: Open, High, Low, Close and Volume.
Candle: Open/Close (72)
TWO values per marker: Open and Close. A "Candle" financial equity chart
Stock: High/ Low (73...75)
TWO values per marker: High and Low.
Stock: High/Low/Close (76...78)
THREE values per marker: High, Low, and Close.
Stock: Open/High/Low/Close (79...81)
FOUR values per marker: Open, High, Low, and Close
Stock: High/Low/Volume (82)
THREE values per marker: High, Low and Volume
Stock: Open/High/Low/Close/Volume (83)
FIVE values per marker: Open, High, Low, Close, and Volume
Candle: Open/Close/Volume (84)
THREE values per marker: Open, Close, and Volume.
Histogram (85...86)
ONE value per marker
Spectral Map (87)
ONE value per marker
Stock: High/Low/Close/ Volume (88)
FOUR values per marker: High, Low, Close, and Volume
Bubble Chart (89)
THREE values per marker: X, Y, and Z, in that order.
Bubble Chart with Labels (90)
FOUR values per marker: X, Y, Z, and text label, in that order.
Bubble Chart Dual-Axes (91)
THREE values per marker: X, Y, and Z, in that order.
Bubble Chart with Labels Dual-Axis (92)
FOUR values per marker: X, Y, Z, and text label, in that order.
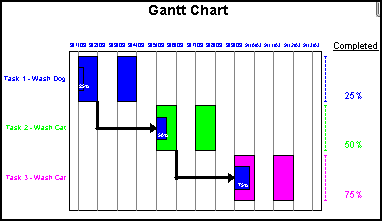
Gantt Charts (99)
SEVEN values per marker: First Start Date, First End Date, Percent Complete Value, Second Start Date, Second End Date, Child Link Line, Roll Up
Waterfall Charts (100...101)
ONE value per marker
Pareto Charts (102)
ONE value per marker
Multi-Y Charts (103...105)
ONE value per marker
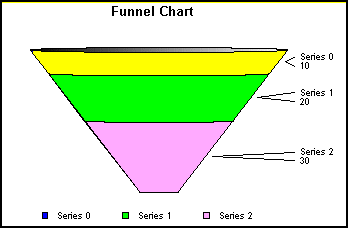
Funnel Charts (106)
One value for each series/section of the funnel. Only one group is shown in a funnel chart.
Gauge Chart (110)
ONE value per gauge
NOTES:
- If your application does not supply the correct number of values for each data point in your chart, you may receive the message "not enough data to draw chart". If you are using setData() to define values, make sure you use setDataRangeToExtent() after the last setData() method to apply all data values to the chart.
- Clustered Bar, Stacked Bar, Line, and Scatter charts may use a time scale axis. See "Time Scale Axis Charts" for special data requirements for defining a time scale axis.
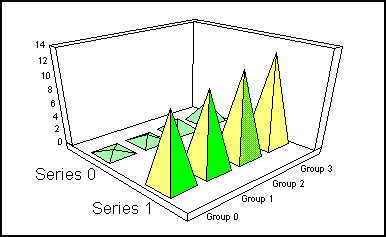
All 3D charts require one value for each series/group. The following sample program creates a 3D pyramid chart with two series and four groups:
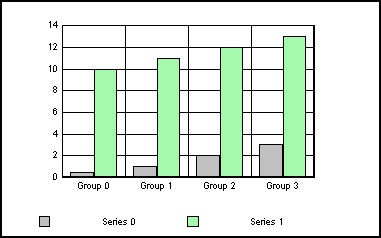
The following sample program creates a vertical bar chart with two series and four groups.
This data produces a vertical bar chart in the following format:
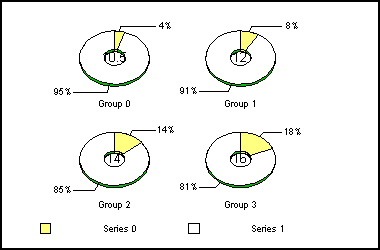
The following data is the same as the sample data that was used to define vertical bar chart except a multiple ring pie chart is selected. In pie charts, each series defines a slice in the pie and each group defines a pie:
When this data is used to define a pie chart, the chart is displayed in the following format:
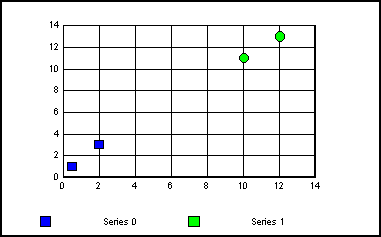
XY Scatter Charts require two values per marker -- X and Y, in that order.
Since there are eight setData() statements in the example code, four markers are drawn in the scatter chart.
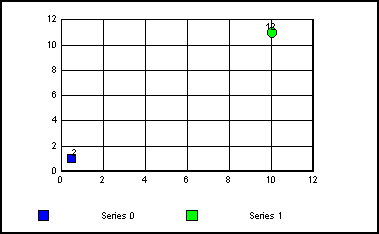
XY Scatter Charts with labels require three values per marker -- X and Y and text label, in that order.
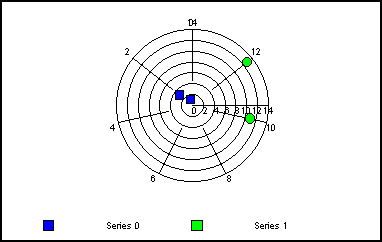
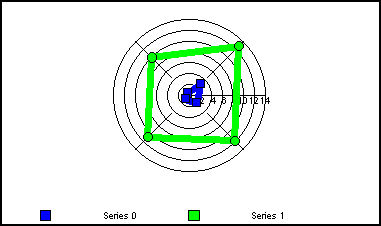
Polar charts require two values per marker in the following order: X (degree) and Y (distance from center).
Radar charts require one per marker to be drawn in the chart.
The spectral map requires one value for each cell to be drawn in the map.
When this data is used to define a spectral map, the chart is displayed in the following format:
A bubble chart with labels (GraphType 92) requires four values per marker: X, Y, Z, and Text Label:
When this data is used to define a bubble chart, the chart is displayed in the following format:
A funnel chart is basically a pie chart that shows only one group of data at a time from. The series in the group are stacked in the funnel with the first series at the top and the last series at the bottom. Since the funnel chart shows only one group of data at a time, the data that defines the chart should include multiple rows (series) and one column (group). If a data set includes multiple columns (groups), you can use setDisplayFunnelGroup() to define which group to display in the funnel chart. The following code defines a simple funnel chart with one group and three series:
setUseSampleData (false);
setData (0,0,10);
setData (1,0,20);
setData (2,0,30);
setSeriesLabel (0, "Series 0");
setSeriesLabel (1, "Series 1");
setSeriesLabel (2, "Series 2");
setDisplayFunnelGroup (0);
setDataRangeToExtent();
setGraphType (106);
setTitleString ("Funnel Chart");
setSubtitleString ("DisplayFunnelGroup = 0");
setTransparentBorderColor (getFrame(), true);
A Gantt chart provides a clear and simple expression of the initially scheduled start and completion dates of the events that contribute to a particular project. In Perspective for Java, series labels apply to tasks and group labels apply to the quality legend. Note that all date formats are Java based.
Each "task" in the gantt chart is defined by a series similar to the way a series is defined for a typical bar chart. The following forms of the setData() method is used to defined tasks in a gantt chart:
Where:
row = a task number
col = one of the following:
Each task/series must be defined with 7 columns: 1) start date, 2) stop date, 3) percent complete, 4) second start date, 5) second stop date, 6) child linkline, and 7) a parent task identifier.
If col is TASK_PERCENT_COMPLETE (2), set fValue to a value in the range 0...100 identifying the task's percent complete. If col is TASK_CHILDLINKLINE (5), set fValue to a task number that the current task is linked to or TASK_UNLINKED (-1) to indicate the task is not linked to another task. If col is TASK_PARENT_IF_ROLLEDUP (6), set fValue to a task number that the current task is rolled up to or TASK_NOTROLLEDUP (-1) to indicate the task is not rolled up. The setSeriesLabel() method can be used to define task/series labels.
EXAMPLE:
The color for a task and task label is set using setFillColor():
In the example above, the child link line is set to task 1 so a line will be drawn from task 0 to task 1. In this example, the task is set to TASK_NOTROLLEDUP. If a task is rolled up it becomes a subtask of the parent task. An example of setting the rollup field for a task is as follows:
This task will now be rolled up within task 6 and will not display as a separate task. This function allows the subgrouping of tasks within a parent task. Note that the date range of a task that is rolled up should fit within the date range of the parent.
If the second start/stop dates are not used for a task, they should be set the same date or outside the range of the start and end dates. If a task is outside the start and end date range, it will not be drawn.
After all tasks have been defined, use one of the following methods to range of data to be charted:
If setDataRange() is used, colStop must be set to 6 identifying the zero-based 7 items required to define each task. Example:
If the total number of tasks shown (vertically) in the chart is less than the number of tasks set in the data range, a small downward arrow will be drawn at the bottom-left corner of the frame. This indicates that extra tasks are in the data range but are not visible in the chart.
If a task starts within the start date and end date and extends beyond what is horizontally visible in the chart frame, a small amount of the task will draw outside the frame. This indicates that the task is longer than what can be shown horizontally.
The following example code defines a simple gantt chart with three tasks:
setGraphType (99);
setTitleString ("Gantt Chart");

setSubtitleDisplay (false);
setFootnoteDisplay (false);
setLegendDisplay (false);

setData (0, 0, 8, 1, 2003); // 1) First Start Date
setData (0, 1, 8, 2, 2003); // 2) First End Date
setData (0, 2, 25.0);       // 3) Percent Complete
setData (0, 3, 8, 3, 2003); // 4) Second Start Date
setData (0, 4, 8, 4, 2003); // 5) Second End Date
setData (0, 5, 1);         // 6) Child Task Link Line
setData (0, 6, -1);        // 7) Roll up

setSeriesLabel (0, "Task 1 - Wash Dog");
setData (1, 0, 8, 5, 2003);
setData (1, 1, 8, 6, 2003);
setData (1, 2, 50.0);
setData (1, 3, 8, 7, 2003);
setData (1, 4, 8, 8, 2003);
setData (1, 5, 2);
setData (1, 6, -1);

setSeriesLabel (1, "Task 2 - Wash Cat");
setData (2, 0, 8, 9, 2003);
setData (2, 1, 8, 10, 2003);
setData (2, 2, 75.0);
setData (2, 3, 8, 11, 2003);
setData (2, 4, 8, 12, 2003);
setData (2, 5, -1);
setData (2, 6, -1);

setSeriesLabel (2, "Task 3 - Wash Car");
setStartDate (8,1,2003);
setCurrentDate (8,15,2003);
setEndDate (8,30,2003);
setDataRange (0,0,2,6);
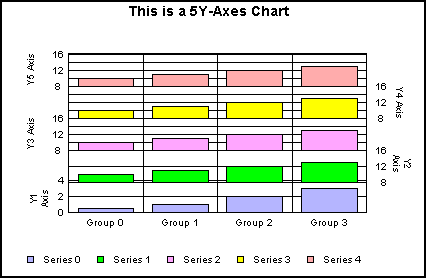
The data that is required for a multi-Y (3Y-, 4Y- or 5Y-axis) chart is the same as for any normal bar chart. By default, axis labels are staggered with odd numbered (1/3/5) axis labels on the left and even numbered (2/4) axis labels on the right. These default settings can be change with setAxisSide(). The setAxisAssignment() method must be used to assign each series in the data set to the desired axis (Y1, Y2, Y3, Y4, Y5). The following example creates a 5Y-axes chart with a single series assigned to each axis:
setUseSampleData (false);
setDepthRadius (0);
setData (0,0,.5);
setData (0,1,1);
setData (0,2,2);
setData (0,3,3);
setData (1,0,10);
setData (1,1,11);
setData (1,2,12);
setData (1,3,13);
setData (1,0,10);
setData (2,0,10);
setData (2,1,11);
setData (2,2,12);
setData (2,3,13);
setData (3,0,10);
setData (3,1,11);
setData (3,2,12);
setData (3,3,13);
setData (4,0,10);
setData (4,1,11);
setData (4,2,12);
setData (4,3,13);
setDataRangeToExtent();
setSeriesLabel (0,"Series 0");
setSeriesLabel (1,"Series 1");
setSeriesLabel (2,"Series 2");
setSeriesLabel (3,"Series 3");
setSeriesLabel (4,"Series 4");
setGroupLabel (0,"Group 0");
setGroupLabel (1,"Group 1");
setGroupLabel (2,"Group 2");
setGroupLabel (3,"Group 3");
setGraphType (105);
setAxisAssignment (1,1);
setAxisAssignment (2,2);
setAxisAssignment (3,3);
setAxisAssignment (4,4);
setY1TitleString ("Y1 Axis");
setY2TitleString ("Y2 Axis");
setTextString (getY3Title(), "Y3 Axis");
setTextString (getY4Title(), "Y4 Axis");
setTextString (getY5Title(), "Y5 Axis");
setAlignMultiYBars (true);
setTitleString ("This is a 5Y-Axes Chart");
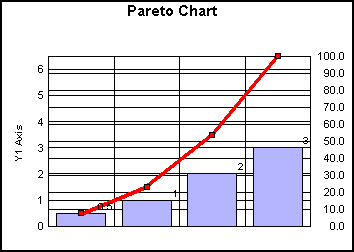
In pareto charts, the X-axis scale is shows group numbers .The Y-axis scale is the percent of the total accumulation for each selected series. Each chart displays a single series. The following methods and properties create a simple pareto chart.
setUseSampleData (false);
setDepthRadius (0);
setDataTextDisplay (true);
setData (0,0,.5);
setData (0,1,1);
setData (0,2,2);
setData (0,3,3);
setDataRangeToExtent();
setTitleString ("Pareto Chart");
setY1TitleString ("Y1 Axis");
setGraphType (102);
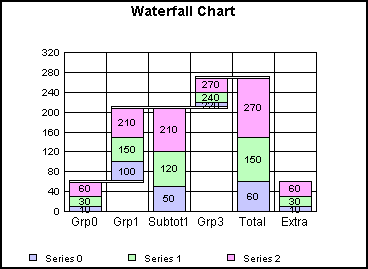
Waterfall charts (GraphTypes 100 & 101) essentially require one data value for each series/group marker to be drawn in a chart. Each setData() assigns a value to a series/group that is drawn similar to a stacked bar chart. The group mode (Normal, Subtotal, Total, or Extra) determines how each series/group value is interpreted. The setWaterfallGroupMode() method assigns each group in the data set to be charted as a normal, a subtotal, total, or extra group.
Where:
nGroup is a group number
nGroupMode can be one of the following:
For a Normal group, series risers are stacked on top of each other and each successive series represents the value of its series/group plus any preceding series/group. For a Subtotal or Total group, the data for the group is ignored and the cumulative total up to this point will be shown for this group. Only one group in a chart can designated as a Total. An Extra group is not used when performing any waterfall cumulative sums. It will appear just as stacked data. When used, it should be defined as the last group in the chart.
The sign of each group of data can be positive or negative. Mixed signs of data (positive or negative) for a group will force the sign of all data for the group to be the first sign of the data for series zero. Zero is used for any missing data.
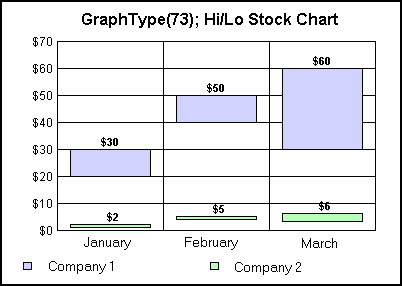
GraphTypes 73...75
For High/Low stock charts (GraphType 73...75), the chart requires two values (high and low) for each riser to be drawn in the chart. The following example data defines two series (rows 0 & 1) and three high/low values (0...5 columns) for each series.
setUseSampleData (false);
setData (0,0,30); // Company 1 - Stock 1/January High
setData (0,1,20); // Company 1 - Stock 1/January Low
setData (0,2,50); // Company 1 - Stock 1/February High
setData (0,3,40); // Company 1 - Stock 1/February Low
setData (0,4,60); // Company 1 - Stock 1/March High
setData (0,5,30); // Company 1 - Stock 1/March Low
setData (1,0,2); // Company 2 - Stock 2/January High
setData (1,1,1); // Company 2 - Stock 2/January Low
setData (1,2,5); // Company 2 - Stock 2/February High
setData (1,3,4); // Company 2 - Stock 2/February Low
setData (1,4,6); // Company 2 - Stock 2/March High
setData (1,5,3); // Company 2 - Stock 2/March Low
setGraphType (73);
setDataRange (0,0,1,6);
setDataTextDisplay (true);
setDataTextFormat (6);
setY1LabelFormat (6);
setTitleString ("GraphType (73); Hi/Lo Stock Chart");
setLegendDisplay (true);
setSeriesLabel (0, "Company 1");
setSeriesLabel (1, "Company 2");
setGroupLabel (0, "January");
setGroupLabel (1, "February");
setGroupLabel (2, "March");
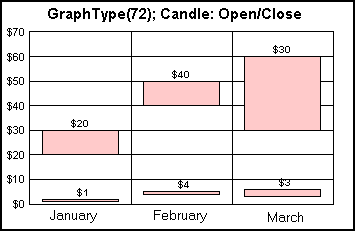
GraphType 72
The Candle Open/Close stock chart (GraphType 72) requires two values per marker: Open and Close.
setUseSampleData (false);
setData (0,0,30); // Open
setData (0,1,20); // Close
setData (0,2,50); // Open
setData (0,3,40); // Close
setData (0,4,60); // Open
setData (0,5,30); // Close
setData (1,0,2);
setData (1,1,1);
setData (1,2,5);
setData (1,3,4);
setData (1,4,6);
setData (1,5,3);
setGraphType (72);
setDataRange (0,0,1,6);
setDataTextDisplay (true);
setDataTextFormat (6);
setY1LabelFormat (6);
setTitleString ("GraphType (72); Candle: Open/Close");
setLegendDisplay (true);
setSeriesLabel (0, "Company 1");
setSeriesLabel (1, "Company 2");
setGroupLabel (0, "January");
setGroupLabel (1, "Febrary");
setGroupLabel (2, "March");
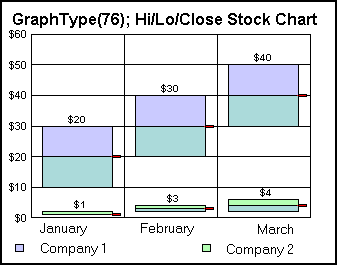
GraphTypes 76...78
The High/Low/Close stock chart requires 3 values per marker in the following order: High, Low, and Close:
setUseSampleData (false);
setData (0,0,30);
setData (0,1,10);
setData (0,2,20);
setData (0,3,40);
setData (0,4,20);
setData (0,5,30);
setData (0,6,50);
setData (0,7,30);
setData (0,8,40);
setData (1,0,2);
setData (1,1,1);
setData (1,2,1);
setData (1,3,4);
setData (1,4,2);
setData (1,5,3);
setData (1,6,6);
setData (1,7,2);
setData (1,8,4);
setGraphType (76);
setDataRange (0,0,1,9);
setDataTextDisplay (true);
setDataTextFormat (6);
setY1LabelFormat (6);
setTitleString ("GraphType (76); Hi/Lo/Close Stock Chart");
setLegendDisplay (true);
setSeriesLabel (0, "Company 1");
setSeriesLabel (1, "Company 2");
setGroupLabel (0, "January");
setGroupLabel (1, "February");
setGroupLabel (2, "March");
setFillColor (getStockCloseTick(), new Color (255,0,0));
setStockTickLength (100);
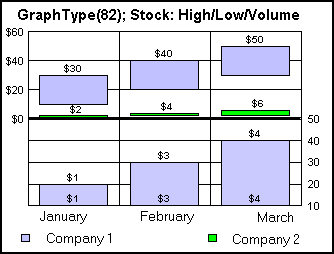
GraphType 82
The stock High/Low/Volume chart requires three values per marker: High, Low, and Volume:
setUseSampleData (false);
setData (0,0,30);
setData (0,1,10);
setData (0,2,20);
setData (0,3,40);
setData (0,4,20);
setData (0,5,30);
setData (0,6,50);
setData (0,7,30);
setData (0,8,40);
setData (1,0,2);
setData (1,1,1);
setData (1,2,1);
setData (1,3,4);
setData (1,4,2);
setData (1,5,3);
setData (1,6,6);
setData (1,7,2);
setData (1,8,4);
setGraphType (82);
setDataRange (0,0,1,9);
setDataTextDisplay (true);
setDataTextFormat (6);
setY1LabelFormat (6);
setTitleString ("GraphType (82); Stock: High/Low/Volume");
setLegendDisplay (true);
setSeriesLabel (0, "Company 1");
setSeriesLabel (1, "Company 2");
setGroupLabel (0, "January");
setGroupLabel (1, "February");
setGroupLabel (2, "March");
setFillColor (getStockCloseTick(), new Color (255,0,0));
setStockTickLength (100);
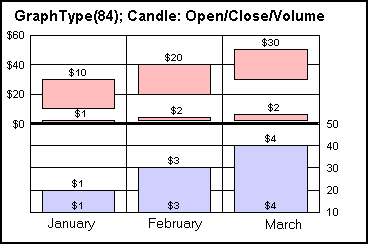
GraphType 84
The Candle Open/Close/Volume chart requires three values per marker: Open, Close, and Volume:
setUseSampleData (false);
setData (0,0,30);
setData (0,1,10);
setData (0,2,20);
setData (0,3,40);
setData (0,4,20);
setData (0,5,30);
setData (0,6,50);
setData (0,7,30);
setData (0,8,40);
setData (1,0,2);
setData (1,1,1);
setData (1,2,1);
setData (1,3,4);
setData (1,4,2);
setData (1,5,3);
setData (1,6,6);
setData (1,7,2);
setData (1,8,4);
setGraphType (84);
setDataRange (0,0,1,9);
setDataTextDisplay (true);
setDataTextFormat (6);
setY1LabelFormat (6);
setTitleString ("GraphType (84); Candle: Open/Close/Volume");
setLegendDisplay (true);
setSeriesLabel (0, "Company 1");
setSeriesLabel (1, "Company 2");
setGroupLabel (0, "January");
setGroupLabel (1, "February");
setGroupLabel (2, "March");
setFillColor (getStockCloseTick(), new Color (255,0,0));
setStockTickLength (100);
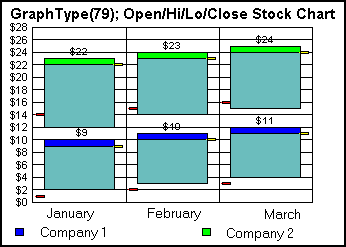
GraphTypes 79...81
For normal stock charts that show high, low, open, and close values (GraphType 79...81), four values are required for each data point. The four values must be supplied in the following order: Open Value, High Value, Low Value, and Close Value. The setData() methods in the following example code, plots the data for three stocks/groups using these open, high, low, and close values:
Open
High
Low
Close
Series 1/ Stock 1 (setData (0,0...3))
1
10
2
9
Series 1/Stock 2 (setData (0,4...7))
2
11
3
10
Series 1/Stock 3 (setData (0,8...11))
3
12
4
11
Series 2/Stock 1 (setData (1,0...3))
14
23
12
22
Series 2/Stock 2 (setData (1,4...7))
15
24
14
23
Series 2/Stock 3 (setData (1,8...11))
16
25
15
24
setUseSampleData (false);
setData (0,0,1);
setData (0,1,10);
setData (0,2,2);
setData (0,3,9);
setData (0,4,2);
setData (0,5,11);
setData (0,6,3);
setData (0,7,10);
setData (0,8,3);
setData (0,9,12);
setData (0,10,4);
setData (0,11,11);
setData (1,0,14);
setData (1,1,23);
setData (1,2,12);
setData (1,3,22);
setData (1,4,15);
setData (1,5,24);
setData (1,6,14);
setData (1,7,23);
setData (1,8,16);
setData (1,9,25);
setData (1,10,15);
setData (1,11,24);
setDataRange (0,0,1,12);
setDataTextDisplay (true);
setDataTextFormat (6);
setY1LabelFormat (6);
setLegendDisplay (true);
setSeriesLabel (0, "Company 1");
setSeriesLabel (1, "Company 2");
setGroupLabel (0, "January");
setGroupLabel (1, "February");
setGroupLabel (2, "March");
setStockTickLength (100);
setFillColor (getStockOpenTick(), new Color (255,0,0));
setFillColor (getStockCloseTick(), new Color (255,255,0));
setY1MajorGridStep (2);
setTitleString ("GraphType (79); Open/Hi/Lo/Close Stock Chart");
setGraphType (79);
The size/height of each riser illustrates low/high values. The red tick marks identify open values. The yellow tick marks and data text show close values. The bar at the top of each riser illustrates the difference between close and high values.
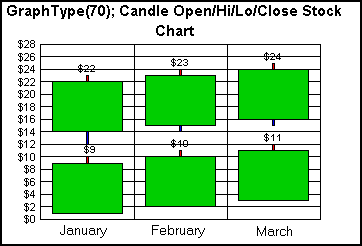
GraphType 70
This same data set can be used to produce a Candle Open/High/Low/Close stock chart (GraphType 70). This graph type also requires four values per marker: Open, High, Low, and Close. The following methods were added to the previous data set to produce the following chart:
setTitleString ("GraphType (70);
Candle Open/Hi/Lo/Close Stock Chart");
setGraphType (70);
setLineWidth (getStockHighLine(), 2);
setFillColor (getStockHighLine(), new Color (255,0,0));
setLineWidth (getStockLowLine(), 2);
setFillColor (getStockLowLine(), new Color (0,0,255));
In this graph type, the size/height of each riser illustrates Open and Close values. The data text shows each Close value. The length of the red tick at the top of each riser extends the riser to the stock's High value. If a stock's Low value is less than its Open value, a tick mark will be drawn at the bottom of the riser to show how much less the low value is from the open. These tick marks are shown in blue in the top risers in the example chart above.
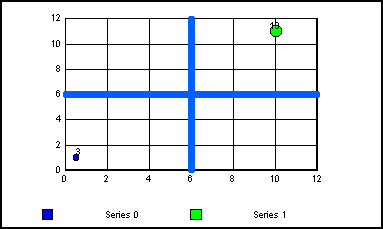
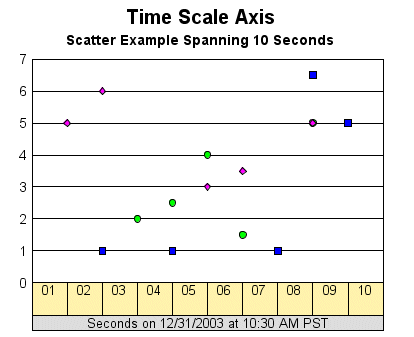
A time scale axis uses time to display data. A time scale axis can be defined in clustered bar, stacked bar, line, and scatter charts. The sample data sets provided with Perspective are not suitable for a time scale axis. The UseSampleData property must be set to false and the setData() method must be used to define dates/times and data to be charted. Each data point to be charted requires two values: a date/time specification and a value. Use the following form of the setData() method to specify date/time values:
void setData (int row, int col, double fValue);
The following methods must be used to set the starting and ending date boundaries of a time scale axis:
void setStartDate(double newValue);
void setEndDate(double newValue);Data is stored as a long representing the specified number of milliseconds since the standard base time (i.e., January 1, 1970, 00:00:00 GMT). The getMillisFromDate() method is used to calculate the number milliseconds from a given date. Months are not zero based and span 1 (January) to 12 (December).
EXAMPLE 1:
restoreDefaults();
setUseTimeScaleAxis(true);
setTimeScaleAxisDefaults();
setUseSampleData(false);
setData(0, 0,getMillisFromDate (2003, 12, 31, 10, 30, 02));
setData(0, 1, 1.0);
setData(0, 2, getMillisFromDate(2003, 12, 31, 10, 30, 04));
setData(0, 3, 1.0);
setData(0, 4,getMillisFromDate (2003, 12, 31, 10, 30, 07));
setData(0, 5, 1.0);
setData(0, 6,getMillisFromDate (2003, 12, 31, 10, 30, 8));
setData(0, 7, 6.5);
setData(0, 8,getMillisFromDate (2003, 12, 31, 10, 30, 9));
setData(0, 9, 5.0);
setData(1, 0,getMillisFromDate (2003, 12, 31, 10, 30, 3));
setData(1, 1, 2.0);
setData(1, 2,getMillisFromDate (2003, 12, 31, 10, 30, 4));
setData(1, 3, 2.5);
setData(1, 4,getMillisFromDate (2003, 12, 31, 10, 30, 5));
setData(1, 5, 4.0);
setData(1, 6,getMillisFromDate (2003, 12, 31, 10, 30, 6));
setData(1, 7, 1.5);
setData(1, 8,getMillisFromDate (2003, 12, 31, 10, 30, 8));
setData(1, 9, 5.0);
setData(2, 0,getMillisFromDate (2003, 12, 31, 10, 30, 1));
setData(2, 1, 5.0);
setData(2, 2,getMillisFromDate (2003, 12, 31, 10, 30, 2));
setData(2, 3, 6.0);
setData(2, 4,getMillisFromDate (2003, 12, 31, 10, 30, 5));
setData(2, 5, 3.0);
setData(2, 6,getMillisFromDate (2003, 12, 31, 10, 30, 6));
setData(2, 7, 3.5);
setData(2, 8,getMillisFromDate (2003, 12, 31, 10, 30, 8));
setData(2, 9, 5.0);
setStartDate(getMillisFromDate(2003,12, 31, 10, 30, 0));
setEndDate(getMillisFromDate(2003,12, 31, 10, 30, 10));
setDataRangeToExtent();
setGraphType(61);
setTextString(getTitle(),"Time Scale Axis");
setDisplay(getTitle(),true);
setTextString(getSubtitle(),"Scatter Example Spanning 10 Seconds");
setDisplay(getSubtitle(),true);
setDisplay(getFootnote(),false);
setLevelInterval(0, 1);
setLevelTextFormat(0, -1);
setLevelDateFormat(0,"ss");
setLevelInterval(1, 8);
setLevelTextFormat(1, -1);
setLevelDateFormat(1,"'Seconds on ' MM/dd/yyyy 'at' HH:mm a z");
setLevelInterval(2, 0);
setLevelFillColor(0, new Color(255,243,172));
setLevelHeight(0, 2600);
EXAMPLE 2:
restoreDefaults();
setUseTimeScaleAxis(true);
setUseSampleData(false);
setData(0, 0,getMillisFromDate (2003, 12, 28, 0, 0, 0));
setData(0, 1, 10.0);
setData(0, 2,getMillisFromDate (2003, 12, 29, 0, 0, 0));
setData(0, 3, 20.0);
setData(0, 4,getMillisFromDate (2003, 12, 30, 0, 0, 0));
setData(0, 5, 30.0);
setData(0, 6,getMillisFromDate (2003, 12, 31, 0, 0, 0));
setData(0, 7, 19.0);
setData(0, 8,getMillisFromDate (2004, 1, 1, 0, 0, 0));
setData(0, 9, 20.0);
setData(0, 10,getMillisFromDate (2004, 1, 2, 0, 0, 0));
setData(0, 11, 25.0);
setData(0, 12,getMillisFromDate (2004, 1, 3, 0, 0, 0));
setData(0, 13, 22.0);
setData(0, 14,getMillisFromDate (2004, 1, 4, 0, 0, 0));
setData(0, 15, 23.0);
setData(1, 0, getMillisFromDate (2003, 12, 28, 0, 0, 0));
setData(1, 1, 12.0);
setData(1, 2,getMillisFromDate (2003, 12, 29, 0, 0, 0));
setData(1, 3, 12.0);
setData(1, 4,getMillisFromDate (2003, 12, 30, 0, 0, 0));
setData(1, 5, 21.0);
setData(1, 6,getMillisFromDate (2003, 12, 31, 0, 0, 0));
setData(1, 7, 15.0);
setData(1, 8,getMillisFromDate (2004, 1, 1, 0, 0, 0));
setData(1, 9, 23.0);
setData(1, 10,getMillisFromDate (2004, 1, 2, 0, 0, 0));
setData(1, 11, 25.0);
setData(1, 12,getMillisFromDate (2004, 1, 3, 0, 0, 0));
setData(1, 13, 25.0);
setData(1, 14,getMillisFromDate (2004, 1, 4, 0, 0, 0));
setData(1, 15, 27.0);
setStartDate(getMillisFromDate(2003, 12, 28, 0, 0, 0));
setEndDate(getMillisFromDate(2004, 1, 4, 23, 23, 59));
setDataRangeToExtent();
setGraphType(17);
setSeriesType(getSeries(0),1);
setSeriesType(getSeries(1),2);
setTextString(getTitle(),"Time Scale Axis");
setDisplay(getTitle(),true);
setTextString(getSubtitle(),"Bar Line Example Spanning 1 Week");
setDisplay(getSubtitle(),true);
setDisplay(getFootnote(),false);
setDisplay(getX1MajorGrid(),false);
setLevelInterval(0, 4);
setLevelInterval(1, 6);
setLevelInterval(2, 8);
setLevelTextFormat(0,0);
setLevelTextFormat(getTimeScaleLevel(1),2);
setLevelTextFormat(getTimeScaleLevel(2),2);
setPlace(true);