|
|
A graph is imaged by drawing objects on an output device. Each object has one or more attributes that describe how the object will appear. These attributes are described in Chapter 10. The procedures required to create a graph will be slightly different depending on whether or not the OpenGL graphics library is being used. If you are using the OpenGL graphics library, see the Advanced 3D Rendering information in Chapter 8. If you are not using the OpenGL graphics library, the process of creating a graph requires these steps: |
|
|
1. |
Initialize the Library. Your application must initialize the library. This is only done once in your application. |
|
|
2. |
Allocate a Graph Pointer to set aside the memory needed for the graph. |
|
|
3. |
Allocate a Draw Environment (DE) to set aside memory needed to describe device context (DC) information. |
|
|
4. |
Connect a Data Source. The library calls functions in your application to retrieve the data for charting and the strings used for titles and labels. This chapter uses the data callback method of accessing data. See Chapter 4 for information about the data callback interface. |
|
|
5. |
Load a Chart Template File into the graph structure. Loading the template file initializes the graph pointer structure with information describing the chart appearance. |
|
|
6. |
Set the Destination Rectangle. The destination rectangle defines (in pixels) the coordinates on the output device context to image the chart. |
|
|
7. |
Draw the graph. Image the graph on the output device. |
|
|
Only one API function is required to initialize the library: |
|
|
// Status of function calls
INT16 nStatus;
// Initialize the library instance
nStatus = InitTDGLIB(); |
|
|
Initializing the library is done only once in your application. It can occur anywhere in your application, but it must be the first API call made to the library. Look at some of the sample code provided with the library for an example of initializing the library. Make sure you check the return value for any errors that might be encountered during initialization. |
|
|
When your application is closing, call the FiniTDGLIB function to indicate that your application is finished using the library: |
|
|
// Status of function calls
INT16 nStatus;
// Finished with the library
nStatus = FiniTDGLIB(); |
|
|
FiniTDGLIB() is only called once when your application is closing or is finished with the library. The graph pointer and draw environment pointer must be freed before you call FiniTDGLIB. |
|
|
The graph pointer points to a structure used by the charting engine to store information about the appearance of the chart. |
|
|
// Pointer to a graph object
GraphPtr gpGraph;
gpGraph = AllocGraphPtr(); |
|
NOTE: |
If you are using the Open GL library, also see "Advanced 3D Rendering" in Chapter 8 for special procedures that are required for this interface. |
|
|
A graph pointer is required for each chart that your application images. It allocates the memory space that the library uses to load a graph look file. The look of a chart contains information about the appearance of the chart. For example, the font used for the title, color of risers, show footnote, etc. The graph pointer is used by your application for all operations on this graph. |
|
|
Your application can allocate as many graph pointers as necessary, within the limits of your computer's memory. A graph pointer must be allocated for each graph created by your application. The AllocGraphPtr() function allocates approximately 7K of memory for use by the library. |
|
|
The graph pointer is defined as a void FAR * in the graphics library header file because you do not have direct access to the structure. Your application can retrieve and modify the chart appearance using API functions and attributes. Sample code for allocating the graph pointer is shown below: |
|
|
// Allocate Graph Pointer
if ( !(m_pGraph = AllocGraphPtr()) )
{
AfxMessageBox("Can't allocate graph pointer!");
return FALSE;
} |
|
|
Check the return value to ensure the pointer was allocated correctly. |
|
|
After your application is finished using the graph pointer, you must free the allocated memory. FreeGraphPtr() frees the memory used by the graph: |
|
|
// Free Graph's Memory
FreeGraphPtr(gpGraph); |
|
|
The draw environment pointer points to a structure used to store information about the Windows handle that is using the engine and the type of output Device Context (DC). |
|
|
//Pointer to standard draw environment
DrawEnvPtr gpDrawEnv;
gpDrawEnv = AllocDrawEnvPtr(hwnd, DE_PORT_NORMAL); |
|
|
At least one draw environment pointer is required to draw a graph. For convenience, you may want to create a draw environment pointer for each child window or each graph. The draw environment pointer stores information that is relevant to the output device (e.g., destination rectangle, default pen, default brush, output device context (DC), etc.) AllocDrawEnvPtr() allocates less than 1K of memory for use by the library. |
|
|
The draw environment pointer is defined as a void FAR * in the graphics library header file because you do not have direct access to the structure. |
|
|
typedef void FAR * DrawEnvPtr; |
|
|
Your application can retrieve and modify necessary parameters using the API functions. |
|
|
//Pointer to draw environment
DrawEnvPtr gpDrawEnv;
gpDrawEnv = AllocDrawEnvPtr ( hwnd, DE_PORT_NORMAL ); |
|
|
Check the return value to ensure the pointer was allocated correctly. |
|
|
After your application is finished using the draw environment pointer, you must free the allocated memory. The FreeDrawEnvPtr() function frees the memory allocated for the draw environment: |
|
|
// free draw environment memory
FreeDrawEnvPtr ( gpDrawEnv ); |
|
|
If you are using the callback version of the charting engine, then you must initialize the pointers to the callback functions. These are user-supplied functions that the charting engine calls to get data and strings. The data is the information being charted and the strings are used for the title, subtitle, headings, etc. Example: |
|
|
BOOL PUBLIC InitDataCallBacks(HINSTANCE hInst,
GraphPtr pGraph, INT16 Rows, INT16 Cols)
{
GraphDataInfo graphData;
GetGraphDataInfo(pGraph, &graphData);
if (!graphData.lpfnGetData)
{
graphData.lpfnGetString =
(LPFNGetStringCallBack)GetStringCallback;
graphData.lpfnGetLabel =
(LPFNGetLabelCallBack)GetLabelCallback;
graphData.lpfnGetData =
(LPFNGetDataCallBack)GetDataCallback;
graphData.lpfnSetPage = NULL;
graphData.lpfnRealToString = NULL;
}
graphData.nPages = 1;
graphData.nRows = 4; // # of Series
graphData.nCols = 3; // # of Groups
graphData.lClientData = (UINT32) pGraph;
graphData.nDataIFMode = DATAIF_CALLBACK;
return SetGraphDataInfo(pGraph, &graphData);
} |
|
|
The data callback version is just one of the data interfaces available with the graphics library. It is used here as an example for setting the data callbacks in an application. See Chapter 4 for a complete description of data interfaces. |
|
|
You can load the initial look of a chart from a Tagged Information Format File (.TIF) using the following method: |
|
|
INT16 Load_TIFFGraph (
GraphPtr pGraph,/* Pointer to a valid graph */
UINT32 ulRequest,
#if defined(WIN32) || UNIX
// Pointer to "C" style string file name
char * pszFileName
#else
// Pointer to MAC File Specification
FSSpec * pFileSpec
#endif
); |
|
|
The ulRequest parameter identifies the information be loaded into the graph structure. See the PGSDK API Guide for details. The following example program shows how a chart is loaded into the graph structure: |
|
|
/* PG MAIN INITIALIZATION */
if ( nStatus = InitTDGLIB() )
{
wsprintf(tmpbuf,
"InitTDGLIB failed (%d)!", nStatus);
MessageBox(NULL, tmpbuf, "WinMain",
MB_OK | MB_ICONHAND | MB_SYSTEMMODAL );
}
/* PG - ALLOCATE A GRAPH POINTER */
if ( !(gpGraph = AllocGraphPtr()) )return FALSE;
/* PG - ALLOCATE DRAW ENVIRONMENT */
if ( !(gpDrawEnv = AllocDrawEnvPtr(
(PORTWINDOW) hwnd, FALSE)) ) return FALSE;
InitDataCallBacks(hInst, gpGraph);
if (nStatus != E00_OK)return FALSE;
// CREATE AN EMPTY SELECTION LIST
gpList = Select_AllocList();
hwnd = CreateWindow("MISC:MAIN", /* Class Name. */
"Multi-Dimensional Sample",/* Title */
WS_OVERLAPPEDWINDOW, /* Style bits. */
CW_USEDEFAULT, /* x - default */
0, /* y - default */
CW_USEDEFAULT, /* cx - default*/
0, /* cy - default*/
NULL, /* No parent */
NULL, /* Class menu.*/
hInstance, /* Creator */
NULL ) ; /* Params */
// LOAD A BAR GRAPH TEMPLATE AS DEFAULT */
nStatus = Load_TIFFGraph(gpGraph,REQUEST_TDC,
"MULTPIE1.3TF"); |
|
|
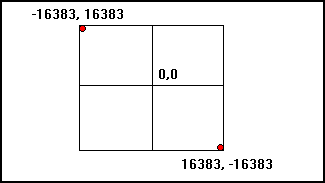
The graphics library uses its own internal virtual coordinate system and all charts are drawn using this system. Regardless of the type of output device, the chart is created using the PGSDK virtual coordinate system. |
|
|
|
|
|
The following definitions in the header file define the maximum size of a rectangle in virtual coordinates: |
|
|
#define |
Value |
|
|
VirtualXMIN |
(-16383) |
|
|
VirtualXMAX |
16383 |
|
|
VirtualYMIN |
(-16383) |
|
|
VirtualYMAX |
16383 |
|
|
Virtual coordinates are converted to device coordinates when an object is drawn on the device. Some objects can be resized and relocated. The size of some objects in a chart is calculated by the charting engine at run-time and cannot be changed. |
|
|
The library provides a number of API functions to translate external, platform-specific data (e.g., screen coordinates) to and from the library's virtual coordinates. The DESetDestRect() API function defines the rectangle to image the chart on the output device context. The coordinates are in the output device context coordinates: |
|
|
Rect rClient; // Rectangle in the client area
rClient.top=0;
rClient.left=0;
rClient.bottom=480;
rClient.right=640;
DrawEnvPtr gpDrawEnv; // Pointer to a draw environment
DESetDestRect(gpDrawEnv, &rClient ); // Set rectangle |
|
|
Everything is now set up, and we're ready to image the graph. Drawing consists of four API calls. These four functions should always be together in order to properly image the chart. |
|
|

|
DESetPortInfo() sets the device context in the draw environment. Before drawing the chart, the device context and device context type must be set. The Device Context (DC) is a Windows DC identifying the output device. It can be the screen, printer, etc. The device type identifies the device that the DC belongs to. |
|
|
|
DrawBegin() prepares the draw environment for imaging the chart. |
|
|
|
DrawTheGraph() images the chart on the output device. The draw environment pointer identifies the output device to image the chart and the graph pointer identifies the chart to be imaged. The chart is imaged in three layers: background, graph, and annotation layer. The three layers are described in more detail below (See Graph Layers). Three parameters in DrawTheGraph() identify which of the three layers is imaged. Any combination of the three layers can be imaged. |
|
|
|
DrawEnd() notifies the draw environment that imaging of the graph is complete. |
|
NOTE: |
If you are using the Open GL library, also see "Advanced 3D Rendering" in Chapter 8 for special procedures that are required for this interface. |
|
|
Drawing the chart is normally accomplished as a result of a WM_PAINT message from Windows. |
|
|
void CMysampView::OnDraw(CDC* pDC)
{
CMysampDoc* pDoc = GetDocument();
ASSERT_VALID(pDoc);
Rect r;
GetClientRect(m_Bounds);
SetRect(&r, m_Bounds.left,m_Bounds.top,
m_Bounds.right,m_Bounds.bottom);
if (m_GraphValid && !m_Bounds.IsRectEmpty())
{
/* SET CHART SIZE & LOCATION IN WINDOW */
DESetDestRect(m_pDrawEnv, &r);
/* SET DRAWING MODE TO NORMAL,ON-SCREEN */
DESetPortInfo(m_pDrawEnv,(PORTWINDOW)
pDC->GetSafeHdc(),DE_PORT_NORMAL);
DrawBegin(m_pDrawEnv); /* DRAW THE GRAPH */
DrawTheGraph(m_pDrawEnv, pDoc->m_pGraph,
TRUE, TRUE, TRUE);
DrawEnd(m_pDrawEnv);
}
} |
|
|
If you provide the ability to select and modify the attributes of chart objects, a selection list pointer must be initialized. Example: |
|
|
CComSelList::CComSelList()
{
m_pSelList = ::Select_AllocList();
m_pDetNodeRef= ::AllocPtrClear(sizeof(DetNodeRef ));
m_nDragHandle = HANDLE_NONE;
} |
|
|
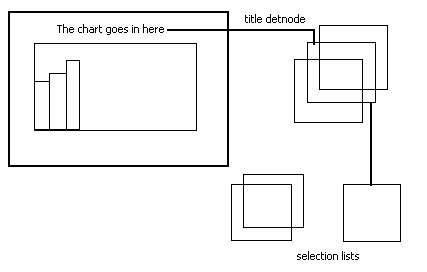
User selections are made by the detection of a mouse click on a chart object. During the chart drawing process a detection node (detnode) is created for each object on the screen. A detnode describes the object, e.g. its position on the screen, series and group number, color, font, line size, object type, etc. Detnodes are created for all the objects on the chart, title, frame, risers, legend, grid lines, areas, etc. |
|
|
The detnode is passed to a selection list API to add the object to the selection list. A selection list is a linked list of user-selected objects. This allows the user to use SHIFT-left-click to keep adding objects to the selection list and modify an attribute to effect all selected objects. This sample adds and removes items from a selection list: |
|
|
void CComSelList::SelectObject( CComDrawEnv& de,
BOOL bShiftKey, CComPoint pt )
{
SelItemPtr pSelItem;
// change to virtual coordinate
de.DeviceToVirtual( pt );
if (::FindDetNode ( (GraphPtr) m_pGraph, &pt,
(DetNodeRefPtr) m_pDetNodeRef))
{
// if shift pressed, search to see if
// already selected. If it is, deselect.
// If not, add it to the selection list.
// -------------------------------------
if (bShiftKey)
{
pSelItem = ::Select_SearchList (
(SelListPtr) m_pSelList,
(DetNodeRefPtr) m_pDetNodeRef);
if (pSelItem)
{
XOR_SelItem( de, pSelItem );
::Select_RemoveItem (
(SelListPtr) m_pSelList,
(SelItemPtr) pSelItem);
}
else AddItemToList( de, FALSE );
} |
|
|
/* NO SHIFT KEY */
else
{
pSelItem = ::Select_SearchList(
(SelListPtr) m_pSelList,
(DetNodeRefPtr) m_pDetNodeRef);
if(!pSelItem)AddItemToList(de,TRUE);
}
}
} |
|
|
//=========================================
// CComSelList::AddItemToList
//=========================================
void CComSelList::AddItemToList(
CComDrawEnv& de, BOOL bExclusive )
{
SelItemPtr pSelItem;
XOR_SelList( de );
if( bExclusive ) ::Select_ClearList(
(SelListPtr) m_pSelList );
pSelItem = ::Select_AddItem (
(GraphPtr) m_pGraph,
(SelListPtr) m_pSelList,
(DetNodeRefPtr) m_pDetNodeRef ); |
|
|
// a curve has more than one detnode (with the
// same objectID) add all related objects
// -----------------------------------
if( pSelItem->nObjectID == O2D_CURVE )
{
::Select_AddRelatedItems((GraphPtr) m_pGraph,
(SelListPtr) m_pSelList,
(DetNodeRefPtr) m_pDetNodeRef,
SLR_SAME_OBJECT,FALSE,O2D_CURVE );
} |
|
|
::Select_CalcHandlesItem((DrawEnvPtr)de.GetDrawEnv(),
(SelItemPtr) pSelItem );
XOR_SelList( de );} |
|
|
Highlighting objects in the selection list is also easy. Example: |
|
|
void CComSelList::XOR_SelItem(
CComDrawEnv& de, void * pSelItem )
{
::Select_DrawXorItem((DrawEnvPtr)de.GetDrawEnv(),
(SelItemPtr) pSelItem );
} |
|
|
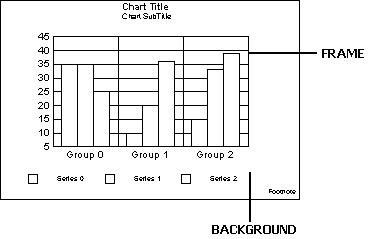
The chart is imaged in three distinct layers: background, graph, and annotation. Three parameters of the DrawGraph API function control whether a layer is imaged or not. The layers are imaged in the following order: background, graph, and annotation. |
|
|
The background layer is a rectangular area defined by the destination rectangle. The destination rectangle is set by the API function call DESetDestRect().The background layer does not contain any other objects, only this one rectangle. |
|
|
The graph layer contains all the components imaged to create the graph. The graph itself is drawn within a frame and all the labels, titles, and legends are drawn outside the frame but within the destination rectangle. |
|
|
The annotation layer contains any annotation objects to be drawn on the chart. Annotations consist of rectangles, rounded rectangles, ellipses, polygons, lines, arrows, free hand lines, and text boxes. |
|
|
|
|
|
All components in a chart are considered objects. Each object is assigned an object ID that can be used to identify it in API function calls to the library. For example, the object ID for the title is O5D_LBLTITLE. This object ID is used to identify the object title when retrieving or setting the attributes of the title. See Chapter 9 for a complete list of object IDs and their definition. |
|
|
Each object has attributes that define the appearance of the object. Some attributes are applicable to all objects. Some attributes are only applicable to a particular chart type, others are only applicable to an object type. See Chapter 10 for a description of chart attributes. |
|
|
Each object in a graph is drawn as an area, a line, or text. For example, the title is text object, a riser on a bar chart is an area, the background is an area, and grid lines are lines. |
|
|
|
Text objects are imaged within a bounding rectangle and are described by attributes such as a font, font style, font size, color, etc. |
|
|
|
Area objects can be a rectangle, circle, polygon, etc. An area is any object that covers surface space on the output device. Area attributes include features such as color or pattern of the brush, and color, width, and style of the pen. |
|
|
|
Lines are described by attributes that control the pen (e.g., width, style, and color). |
|
|
Each object that is drawn to the output device is assigned a detection node (detnode, for short). A detnode contains position information so your application can identify a user-selected object. When the user clicks the mouse on a chart object, the mouse coordinates can be used to determine the detnode/object at that position. The library maintains the detnodes in a linked list for each chart that is imaged on the screen. The detnode list is not created if the output device is anything other than the screen. The generation of the detnode list can be disabled if your application does not allow the user to select chart objects. See Chapter 6 for a detailed description of detnodes. The API functions for handling detnodes are described in the PGSDK API Guide. |
|
|
The primary purpose of a detnode is to select one object on the chart. Once an object is selected, the objects' detnode can be used to add the object to a selection list. The selection list allows you to modify the object's attributes and, therefore, its appearance. |
|
|
Selection lists are created and maintained by your application using library's API functions. A selection list is a linked list of objects. Your application can create multiple selection lists for a chart. The library does all the dirty work for you through the use of the API functions. |
|
|
Many objects in the graph can be added to a selection list. This allows you to select multiple objects and perform actions on all of the objects. For example, selecting the title and subtitle to change the font style. |
|
|
|
|
|
The following sample code illustrates object detection and shows how to add a detnode to an existing selection list is shown below: |
|
|
//Draw Environment Pointer
DrawEnvPtr gpDrawEnv;
GraphPtr gpGraph;/* graph pointer */
SelListPtr gpList; /* selection list pointer */
SelItemPtr gpSelItem; /* selection item */
DetNodeRef gDetNode; /* global DetNode */
case WM_LBUTTONDOWN;
{
//Get the mouse pointer
pt = MAKEPOINT (lParam);
// convert mouse coordinate to virtual
dvPoint(gpDrawEnv,&pt);
// look for detnode at this coordinate
if (FindDetNode (gpGraph, &pt, &gDetNode))
{
// clear the selection list
Select_ClearList (gpList);
// add detnode object to selection list
gpSelItem = Select_AddItem(gpGraph,
gpList, &gDetNode);
}
break;
} |
|
|
This is only a small sample to show how a detnode is used to add an object to a selection list. See Chapter 6 for information about detnodes and selection lists. |